Gams

Showing posts with label Altered projects. Show all posts

Tuesday, January 5, 2016

MCS Guest Designer: Home Decor Project

If you follow me over on Instagram, you may have seen that I've been sharing sneak peeks of a project I had been working on during the month of December.  Well, today I'm finally able to share what that project is -- I've been selected as the guest designer for My Creative Scrapbook kit club for the months of January - March!

I got to work with their Main Kit, the contents of which were revealed on their blog and social media accounts today...


As you can see it's full of the Fancy Pants Happy Place collection, which is just as beautiful and fun to work with, as it appears!

I made four separate projects with this kit that I'll be sharing in the coming days.  The first, and maybe my most favorite of the projects is this altered home décor piece.  I used a Jillibean Soup 'Mix the Media' receipt holder from my stash, along with some recent family photos and the kit contents to create this piece.

 
Here are some close ups...


Stay tuned to the My Creative Scrapbook blog for a tutorial I put together showing how to make this fun heart shaped button embellishment.
 
 
I'll be back again tomorrow to share one of the three additional layouts I made with this kit. I hope you'll join me!
 

Wednesday, November 4, 2015

DCWV & May Arts blog hop

Good afternoon, friends!  If you are visiting from the DCWV/May Arts blog hop and this is your first time here - welcome, I'm so happy to have you!

Admittedly, I haven't yet taken down my Halloween decorations yet (yikes!) but that didn't stop me from getting a head start on some of my Christmas crafting.  I couldn't help it - when I received the new DCWV holiday stacks and an array of gorgeous ribbons from May Arts, I was itching to create.

With that being said, I am certainly in no hurry for Christmas to get here.  I haven't even begun my shopping, after all!  So the first idea that popped into my mind was to create a Christmas countdown.  Now I'll have a fun and sparkly way to remind me how many shopping days are left until Santa's arrival!


Supplies used: DCWV - patterned paper, glittered tags and diecuts, gems; May Arts - grosgrain and sparkle ribbon and twine; American Crafts - glitter clothespin, Kerri Bradford - cut file; Provo Craft - wood plank, Other: hot glue, mono liquid glue, computer font.
I started off with a wooden plaque that measures about 7.5" by 5.5". I had this particular one from Provo Craft, in my stash from long ago, but you could easily find a similar unfinished piece at your local craft store and paint it to your liking

A bit of hot glue and a glittery clothespin make this piece functional as a countdown.  With an array of gorgeous wintery ribbons, I couldn't stop there.  I layered May Arts sparkly blue ribbon atop a navy grosgrain to create a dimensional bow that would accent my clip.  Again, a bit of hot glue does the trick to secure everything into place.


The DIY Project Stack Favor boxes - holiday version, was the perfect companion to my project.  Not only does it have a coordinating color palette and sparkly finish, but the diecut tags included in the stack, were perfectly made for a project of this type!  In addition, the glittery stars and snowflakes were precut and simply punched out from the stack.  A little bit of liquid glue was the right adhesive to give these a smooth and secure hold.


I couldn't stop there with the sparkle and trim.  May Arts makes this beautiful bakers twine that is accented with a silver strand.  It was just the right thickness and size to tie at the top of each of my numbered tags.


Here's a closer look at those tags.  Aren't they pretty?!  They have the most gorgeous sparkly finish that doesn't shed a bit!  The best part is, the hard work is all done for you - the tags are numbered, glittered and diecut.  All you do is simply punch them from the page, tie on some trim and they are ready to be added to your countdown.


Thanks for stopping over to take a closer look at my project.  I hope you'll stop by again soon!
 

Friday, October 23, 2015

DCWV: Happy Day Memo Board

Good morning, blog friends!  Have you been spotting these cute memo boards all over the place lately?  They are intended to provide you with a central place for hanging onto all of those lists, coupons, notes and bits of paper that come into and out of our lives.  As a papercrafter though, I myself can't look at them without dreaming up possibilities to embellish and transform them into a pretty home décor piece.  So, that's just what I did!

I grabbed DCWV's Happy Day stack for this project because I love the neutral color palette that is carried throughout and the pretty pops of gold.  I had fun making all sorts of tags, banners and accents to decorate my memo board.

Supplies used: Target - memo board & large clothespin; DCWV - Happy Day Stack (all patterned papers); Stampin Up - feather stamps & coordinating dies, butterfly punch, flower punch; Crate Paper - chipboard heart, vintage button, and mini clothespins; Basic Grey - mini letter stickers; American Crafts - twine; Other - ribbon.
Let's take a closer look at all of the elements that I've included within my framed piece.

One of my favorite patterns from the stack is the woodgrain covered in intricate shaped frames.  I cut out one of the small frames from the pattern and used it to highlight a punched and embellished butterfly.  It's backed with a doily for a simple yet elegant look. 
 

This sweet little label that adorns the bottom portion of my photo was again, simply cut from one of the included patterns.  I customized it a bit further by adding our last name in coordinating letter stickers from my stash.


There are several pages of cut apart elements included in the stack.  These cute banners are part of one of those patterns.  I accented them with some stamped and embossed feathers for added dimension and interest.


The final element on my décor piece, again features one of the pre-designed sentiment cards that are included in the patterns of the Happy Day stack.  I loved the sentiment and wanted to draw more attention to it by adorning it with a dimensional floral. 

To create my flower, I punched several layers from the pink and gold dotted patterned paper.  I layered the punches together and adhered them with a button center.  The leaves that accent this floral piece were fussy cut from another of the patterns included in the stack.


With just a little bit of creativity and a beautiful stack of DCWV patterned papers it was easy to transform this bland memo board into something special that I will be proud to display in my home!

Wednesday, March 4, 2015

You float my boat: An Altered Project

Good afternoon!  I have a different type of project to share with you today.  If you visit my blog often, you know that I typically default to making scrapbook pages and/or cards - they are my favorite!  But occasionally, the creative mood pulls me in a different direction.  
 
I've been eyeing all of the different type of message/memo boards that have been popping up in home décor.  I love that many of the ones I've seen allow for the pictures and other elements to be switched out, if desired.  A simple clip or clothespin is often all that's used to attach these items to the frame.  Yesterday, I shared my own mini version of one of these memo boards on the Love My Tapes blog.
 
Supplies used: Love My Tapes - red/white stripe washi, light blue star print fabric tape; DCWV - patterned paper; Lawn Fawn - image stamps and sentiment; May Arts - rope-like twine; American Crafts - twine and glittered clothespin; Stampin Up - ink; Other: IKEA frame, Veteran Typewriter font, machine stitching, hot glue.
I used a cheap white IKEA picture frame as the base of my memo board. Once the frames surface was decorated (with washi tape and 'rope-like' twine), I attached my chosen clothespin with a bit of hot glue to the right side of the frame.  The photo booth strip and banner style tags are simply clipped in place and can easily be removed and/or replaced, if I so choose.


Since the photo booth strip was long and narrow, I had extra room for embellishment along the left side of the frame.  I created a sweet little sewn pennant banner to fill in that space, and adorned it with more adorable Lawn Fawn stamped images.

 
This turned out to be a quick and fun project that I'm anxious to display in my home.  I can see myself making many more of these memo frames and switching out the theme, products and color to make each one entirely different from the next.  It could be a pretty fun gift idea, as well!
 

Thursday, October 16, 2014

Spooky cute neighbor treats

As promised, I'm back today to share with you a recent project I had up on the Love My Tapes blog.

It's no secret that I love to bake (almost as much as I love to papercraft!).  But if I kept and consumed all of the yummy treats I whip up, I most certainly would not be able to fit in the clothes in my closet - ha!  So, to share the wealth with my friends and neighbors, and spare my waistline - I love to package up these treats to gift to some of my favorite people.

The cooler temperatures have had me in the mood for pumpkin EVERYTHING.  As of today, I've officially baked six loaves of pumpkin bread.  I found these sweet kraft and orange polka dot boxes at Hobby Lobby, to put all that yummy bread in. They were rather plain on their own, but a bit of washi tape, glitter paper, and a festive sticker or two made for quite a spooky yet sweet presentation.


Supplies used: Hobby Lobby - kraft boxes; We R Memory Keepers - black cardstock; Love My Tapes - black polka dot washi tape, triangle washi tape, self adhesive black glitter paper; Recollections - 3D stickers; Stampin Up - sentiment stamp; Jillibean Soup - kraft tags; Memories - black ink.
 
I started by cutting a black cardstock band, approximately 2.5" wide, to fit around the width of each box.  The cardstock band is wrapped with a few layers of washi tape and self adhesive glitter paper.  In order to create a coordinating bow, I layed and trimmed out strips of washi tape, onto white cardstock.  Doing this, allowed me to treat the tape as ribbon, and construct a pretty layered and dimensional bow.  A simple tag adorned with a cute 3D sticker, stamped sentiment and another strip of the self adhesive glitter paper finishes off this sweet piece.
 
 
To coordinate with the ghost sticker on this next box, I went with a different washi tape.  I just received this tape in my latest LMT design team box and it is one of my very favorites - love the triangles!  And how cute is that Stampin' Up sentiment - "It's Halloween - enjoy every bite."?!!  It couldn't have been more perfect, huh?!


My ideas for pretty packaging don't stop there.  I featured a similar project on the LMT blog here.  These pillowboxes are perfect for a small little treat or even a gift card.  They can be decorated to suit the occasion and are quick and simple to put together.


I hope I've inspired you to pull out your papercrafting supplies the next time you are gifting some goodies - homemade or store-bought!  Thanks for joining me again today! 

Monday, May 26, 2014

Lots of washi

Happy Monday and Memorial Day to my US friends!  I'm spending most of the day enjoying my family but wanted to pop in quickly to share and link you up to a few recent projects that I've had featured on the Love My Tapes blog. 

First is a sweet little tin, that I altered, to hold the bows and barrettes I continue to gather for my little girl's hair.  This piece serves not only as functional organizational container, but also as a cute décor piece to add to her room.

 
For the full details and step by step tutorial to make your own, hop on over to this post on the Love My Tapes blog.
 
Next up is a pair of sweet and simple cards that would be just perfect to hand off on Father's Day, to all of the special Dads in your life. 


Who knew washi tape neck and bow ties could be so cute!  Again, hop on over to this post on the Love My Tapes blog for full directions and a step by step photo tutorial to create your own.
 
Thanks for joining me today!  See you real soon with lots more to share!


Saturday, April 13, 2013

Pebbles 'How To Tuesday'

Have you been as anxious as I have, for the warm, sunny days to arrive?  The date on the calendar now officially states that the start of spring is here, but where I live in the Midwest, we are still waiting on the weather to catch up! 
 
The long wait, has my kids and I longing for warmer days, lots of sunshine and trips to the park, but we have yet to receive any of that despite the fact that the first of spring has come and gone. Therefore, we have been forced to get an early start on our countdown to summer, where we are assured to have the nice weather and sunshine we are dreaming of. 
 
I put together this quick and easy summer countdown board, to help us track the remaining days to summer break, in a fun and festive way.

Supplies used: Pebbles - Party with Amy Locurto Splash (751452), Party with Amy Locurto Tropical (751450), Party with Amy Locurto 12" Printed Vellum Garland (732230), Basics Clothespins (747205), Basics Honeycomb Washi Tape (747211), Other - white cardstock, crochet thread, font - century gothic, IKEA frame.
For step by step pictures and directions, stop by the Pebbles blog to see how I put this fun and simple project together.   Thanks for stopping by!

Friday, October 26, 2012

Create Your Own Palette with Bella Blvd


Need a little something to motivate and inspire you on your next little crafty endeavor?  It can't hurt, right?  If your answer is yes (or if you're just simply in the mood for some crafty eye candy), be sure to stop by the Bella Blvd Studio blog today to find out the details on a 'Create Your Own Color Palette" challenge issued by Stephanie, and for a chance to win some beautiful Bella goodies if you participate!

When I finally get my kiddos tucked away into bed for the evening, and sit down at my scrap desk to craft, my creativity is oftentimes zapped.  Can you relate?  Sometimes, it takes just the right thing to spark my creative juices and inspire me to whip something up (versus collapsing onto the couch in a tired heap - which sometimes happens too, of course!).  This week, it was this fun color palette image below, that rescued me from the nighttime couch potato role!  Stephanie challenged some of the Bella Design Team members to create a project (layout, card, etc) based upon this pretty palette.


Hi Girls. Hope you can help me with my Friday Blog Post this week. I'm going to share a Challenge to readers, "Create your Own Palette". I have used the color palette featured in the image here....and am wondering if anyone wants to play along & complete a project (of any sort card/layout/etc.) using this color palette & Bella Blvd. Anyone have any spare time?! If so, let me know in the comments below and be sure to email ME (not Laura) images of your layout(s) by Thursday afternoon! Thanks girlies!


Funny enough, this is almost exact color scheme that I used to decorate my baby girl's nursery, minus the pop of black.  So naturally once I saw it, I knew it would give me a good excuse to put together a little home decor piece for her room, that I've had sitting in my 'creative bank' since before she was born!  Here is the result:


Supplies used: Bella Blvd Kiss Me collection patterned papers: Flutter, True Love; Bella Blvd Baby Boy collection patterned paper: Momma's Boy; Bella Blvd Designer Tape: Piggy Pink Stripe; Bella Blvd Market Buttons: Pink Flowers; Bella Blvd High Five Alphabet: Piggy Punch; Other - IKEA shadow box frame, crochet twine, computer font, machine stitching, cardstock


The frame I used for this piece was one that I purchased at IKEA awhile back.  It is a 10x10 shadow box, with a 9x9" opening for artwork.  I added Designer Tape to the innermost edge of the frame to add some more color and interest.  At the corners, where the tape strips overlapped, I simply mitered the corners with my craft knife to allow them to line up.

I bought that sweet little Martha Stewart elephant punch specifically for this project!  I'm so glad I finally got to use it for it's intended purpose!  By the way, this cute idea is not solely my own.  Back in the day, Ali Edwards created a sweet little framed pieces like this with punched butterflies.  I've seen lots of interpretations of it since then, and knew that an 'elephant version' alongside that endearing phrase, would make for a cute little addition to Emerson's room.

How cute are those little elephants, marching across the frame in a perfect little row, and punched out of so many pretty Bella papers?


And you know me, I can't finish a project without at least one button!  Love these pretty Bella flower shaped ones!


Want to see what it looks like in her room?  For now, I have it nestled against some of our favorite board books on the bottom left of these three shelves.


I'm so glad to have another decorative piece done for baby girl's nursery.  Considering the fact that she's only weeks away from turning one, it might be time to put the finishing touches on decorating her room!

Thanks, as always, for stopping by!

Wednesday, October 3, 2012

Tricks and Treats

Can you believe that we are already a few days into the month of October?  I'm still trying to wrap my brain around that fact!  It goes without saying though, that this month brings about lots of Halloween hoopla at our house.  As with many of the major holidays, we like to use this time of year as an excuse to whip up some yummy treats and gift them to friends, neighbors, teachers, classmates, etc.  It's a great opportunity to bake up some of our favorite holiday goodies and let those around us feel special with a simple little gift.  (Not too mention the fact that my jeans and scale are thankful that these treats do not sit long at our house!!!).

You can't give away a yummy treat without some cute packaging though, now can you?  I don't think so!  Which is why I broke into some of Pebbles new, adorable Tricks and Treats collection to put together these ghoulishly cute tags!


Supplies used: Tricks and Treats (751337) Tricks and Treats (751329)  Tricks and Treats (751334) Tricks and Treats (751338) American Crafts Coordinating Cardstock - black (71082) Other: Doodlebug Doodletwine (gray),  American Crafts buttons, machine stitching, buttons, tiny attacher.
I dug into the 6x6 paper pad first, as the small scale design of these papers was just perfect for the size of my banner style tags.  I love all of the sentiments on the label-type paper ('gooey globs', 'spookey treats', 'toe of frog') and thought they would be a festive little addition.  I cut them out, stitched up a little topper to adorn them and threaded them on some baker's twine to dangle from each button.  I love the whimsy that they add!

Here's a look at the tags 'in action'.  I've simple stapled them onto small craft bags that I found at my local craft store, and they are ready to give.


Head on over to the Pebbles blog to the 'Whip It Up Wednesday' post featuring my tags and another fun project!

Thanks for stopping by!  I have lots to share in the coming days, so I hope you'll be back to visit soon!

Wednesday, April 25, 2012

SEW many ideas

I will start this blog post with a little confession: I officially admit to having scrapbooking on the brain quite often, during the typical day.  Okay, who am I fooling -- it's probably more like ALL.THE.TIME!  I know, you're surprised, right?!  Who would've guessed it?  ;)  I just can't help myself -- I'm constantly running across things that inspire me: a new favorite photo, fun new scrapbooking goodies, something funny my kids say or do, a page/card I see online or in a magazine, an interesting color combination, etc.  The sources for inspiration are just endless!  Fortunately, pinterest has allowed me to catalog and organize many of the ideas I run across on the Internet, that would otherwise completely be lost in my memory bank.  Have you checked out pinterest yet?  If not, be prepared to devote a couple hours on your first visit!  It is a complete time suck, but oh so much fun, too!  You can look here to view and follow my pinterest boards

Beyond the Internet, however, I needed a way to store and organize additional ideas on paper.  A notebook, of sorts, that I could sketch in, make lists, add pictures, carry coupons -- and one that I could easily store and take with me in my purse (or gigantic diaper bag, as it currently stands!).  So, along came the idea for this sweet little thing:


Supplies used: Paper - My Little Shoebox Sew Cute collection:  Sew Crafty,  Nothing But Buttons, My Little Shoebox Farmer's Market collection: Cherries Jubilee, Lettering: Doodlebug glitter letter stickers and Simply Sweet rubon alpha, Diecut: My Favorite Things label die,  Embellishments: Making Memories mini safety pin, My Mind's eye stick pin, Doodlebug Design baker's twine, Other: eyelet, ribbon, embroidery floss, machine stitching, computer font, buttons, 8x8 page protector, glossy accents, Stampin' Up scallop border punch.

I created the whole thing from scratch, using a piece of chipboard for the base.  Pretty cute, isn't it?  I think it may have something to do with that darling paper line from My Little Shoebox.  I've been hoarding a few pieces of it for quite some time and finally found just the right project to use it on.  Here's a close up of the title label.  As you can see, I put my sewing machine to good use on this little project -- it went perfect with the theme of the book, after all!


I had so much fun decorating and adding dimension to all of the little diecut pieces that I cut from the 'Sew Crafty' patterned paper.  To make the bobbins more dimensional and realistic, I added embroidery floss, ribbon, buttons and paperclips in coordinating colors.  I even pulled out an eyelet to add a realistic looking hinge to the scissors, and covered the heart shaped button piece with glossy accents to mimic a real button.  I adhered all of these elements with a strong adhesive, to ensure that they stay put as this little book get pulled in and out of my bag, a countless number of times.


Here's a look at the inside.


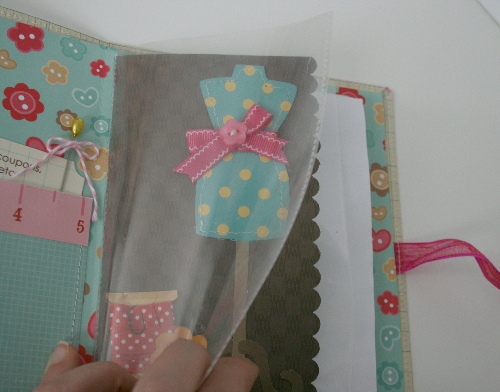
A little pocket at the start of the book, provides a nice spot for storing coupons, pages torn from a magazine or any other extras I want to hang on to.  I used the cute pink ruler that I cut from the 'Sew Crafty' paper to distinguish the pocket's opening and couldn't resist adding a little stick pin for decoration, as it again, coordinated so nicely with the sewing theme!


For even more storage space, and a little extra fun, I folded a 8x8 page protector in half and sewed it into the binding.  This creates two extra 'see through' pockets at the front and back of the book.  I like that it, once filled with items, will provide a bit of a 'peek-a-boo' element to the decorative divider that sits behind it.  I again, gussied up the dress form on the following page, that I cut from the 'Sew Crafty' patterned paper, with ribbon, a button and machine stitching.


Here is the backside of that dividing page:


At the back of the book, I added a spot to house a pad of paper for additional note taking, sketching, list making, etc.  Rather than adhering the backside of the notepad directly to the book, I cut a slit in the patterned paper, so that I could remove the notepad once full, and replace it as needed, in the future.


Seeeeewwww, that's my fun project share for today!  I've already quickly begun to fill this little book up with loads of ideas and inspiration for my next scrapping session.  Thanks for stopping by!  I'll be back soon with some more layout shares. :)