Gams

Showing posts with label Jillibean Soup. Show all posts

Friday, November 25, 2016

25 Days of Christmas Tags: Jillibean style

Hello, thanks for joining me on the blog!  Today, the Jillibean designers are taking part in the final day of the 25 Days of Christmas Tags with Tracey McNeely.
I reached for the Jillibean holiday stamp and shaker products to create this extra special tag.  You can't go wrong with a trio of cute snowmen inside of a sweet little snow globe, can you?!  This tag could adorn just about any holiday package.


I stamped my snowmen onto watercolor cardstock, so that I would be able to use my Zig clean color real brush markers to bring them to life.  A smattering of iridescent sequins and glass seed beads move about inside my shaker element, to add to the look of falling snow.


I took a bit of a risk by attempting to stamp and heat emboss on the outside of the shaker circle.  If you look closely, you'll see that the heat from my heat gun caused the plastic to warp a little bit, but it was nothing I couldn't mask with some additional miniature tags. *If you try this yourself - be sure to keep your heat gun moving, as not to disfigure and/or melt the plastic completely!


Make sure you check out Tracey's blog for a look at all of the tags designed by the rest of the Jillibean team and for your chance to win an awesome prize from Jillibean Soup!

Tuesday, January 5, 2016

MCS Guest Designer: Home Decor Project

If you follow me over on Instagram, you may have seen that I've been sharing sneak peeks of a project I had been working on during the month of December.  Well, today I'm finally able to share what that project is -- I've been selected as the guest designer for My Creative Scrapbook kit club for the months of January - March!

I got to work with their Main Kit, the contents of which were revealed on their blog and social media accounts today...


As you can see it's full of the Fancy Pants Happy Place collection, which is just as beautiful and fun to work with, as it appears!

I made four separate projects with this kit that I'll be sharing in the coming days.  The first, and maybe my most favorite of the projects is this altered home décor piece.  I used a Jillibean Soup 'Mix the Media' receipt holder from my stash, along with some recent family photos and the kit contents to create this piece.

 
Here are some close ups...


Stay tuned to the My Creative Scrapbook blog for a tutorial I put together showing how to make this fun heart shaped button embellishment.
 
 
I'll be back again tomorrow to share one of the three additional layouts I made with this kit. I hope you'll join me!
 

Monday, June 15, 2015

U...Right Now: A Just Nick DT page

Happy Monday! I announced in my post yesterday that I'm part of the the inaugural Just Nick design team.  Today is my first official post on the Just Nick blog, where I'm sharing this page starring my handsome six year old.  Isn't he cute, faux hawk and all?!


Supplies used: Just Nick cut files - Right Now, All Boy; Jillibean Soup -patterned paper, diecuts, stickers, enamel stars; Crate Paper - transparent letter; American Crafts - thicker, twine; October Afternoon - sticker labels, buttons, flair; Zig - Wink of Stella brush pen; Teresa Collins - enamel dots; Other - machine stitching, cardstock, foam adhesive, Veteran Typewriter font, date stamp, black ink pad.
I love adding pages to my kid's scrapbooks that highlight their interests, hobbies and personality traits for each year of their life.  The Right Now cut file, reminded me that I hadn't yet put together a page for my son's sixth year, since it was the perfect title for this type of 'highlight' page.

I love the mix of type in this cut file - it includes both a clean type and funky script.  The original design also includes a circle around the entirety of the design.  However, since I knew I'd be using a lot of linear elements on my page, I opted to remove the circle and simply cut the words.

Once sized, I cut the title two times - once out of cream cardstock and a second time from gray cardstock.  I layered the two cuts together, slightly offsetting the top piece, to create some added shadow and dimension.

 
The majority of my page is pretty busy and colorful, so I opted for a kraft background to ground the whole design.  With the cardstock background in place, the margins of my page still created a little more white space than I was going for.  To solve that problem, I cut some stars from the All Boy cut file out of the same kraft cardstock and layered them over the background piece to create a tone on tone effect.  To make those diecut stars pop just a little bit more, but still not overwhelm the remainder of the design, I colored them with a layer of Wink of Stella brush pen glitter.  The end result turned out to be subtle but cool!
 
 
The fun mix of patterned papers on this page can't be forgotten.  They are all from Jillibean Soup's 'Cool as a Cucumber Soup' collection.  I loved all the patterns so much, I cut 2" squares of my favorites and placed them in an incomplete grid on my background.  Lots of stiching and embellishments tie the entire design together!
 
 
Thanks for joining me today!  I hope you'll stop by the Just Nick blog and let me know what you think of my first post!

Tuesday, January 20, 2015

Love These Three: A Scrapbook Page

Hello!  I'm back again today to share a page of my littles, I put together awhile back, but never got around to sharing here, for one reason or another.  As I mentioned in a recent post, I often like to dig into my older photos to spark my creativity.  These pictures are from three years ago!  Hard to believe my babies were this little!  In fact, looking back on them now, I'm thinking it would be fun to do an updated version of these photos, scrap them (of course!) and put the pages side by side in an album.

Now onto the page details...Aside from some stamping and bits of embellishment, this page is all Jillibean Soup.  I color blocked the background using a one-third, two-thirds approach.  Using the full sheets of patterned paper for the background works in this scenario because of the subtly of the patterns.  The photos still remain the focus and the embellishments carry your eye throughout the page.


Supplies used: Jillibean Soup - patterned paper, stickers, diecuts, buttons; Queen & Co - goosebumps; Stampin' Up - large flower punch, inks; Technique Tuesday - Studio AE stamps; Other - ribbon, adhesive pearls and gems, veteran typewriter font, circle punch.
I built a sweet and custom stamped embellishment piece to accent the ribbon that covers the seam of the patterned papers on my page.  I love that stamping allowed me to completely customize this little cluster, in color and theme!


The floral elements appear to be 'spilling' down the left side of the page. This grouping of flowers was built with a combination of patterns, punches, stamps and various embellishments.  I love the eclectic and almost vintage feel to these flowers, that is achieved by mixing all of these elements. 


Another bit of stamping in the lower right corner, ties my journaling back to the rest of the page, making for a more seamless, cohesive design.

 
That's it for today, friends!  Hope your finding time to get crafty this week!
 

Saturday, September 20, 2014

Gameday Saturdays:Jillibean Soup

It's Saturday!  For me, Saturdays during the fall would not be complete without the opportunity to cheer on my beloved Ohio State Buckeye football team.  I grew up in Columbus, Ohio - home to the Buckeyes, so to say I 'bleed' scarlet and grey, is an understatement!  Today will be a busy one, and I don't know that I'll get to tune into the actual game, but I'll be keeping tabs on the score one way or another! 
 
To celebrate my favorite fall Saturdays, I thought I'd share with you a page on the subject.  We have loads of photos decked out in our Buckeye gear and/or cheering on the team from the stands.  I thought it would be fun, to combine some of those pictures from over the years onto one page.

Supplies used: Jillibean Soup - patterned paper, stickers, diecuts; American Crafts - cardstock; Studio Calico - wood veneer; Michaels - vellum; Pebbles - patterned paper; Other - washi tape, Veteran Typewriter font, Pacifico font, machine stitching.

I love my silhouette for making fun, layered titles like this one.  The 'gameday' portion of the title was cut twice.  Once from patterned paper and a second time from white cardstock.  By layering the two together, but slightly offsetting the white under layer, a shadow is created.  The shadow helps that portion of the title to stand apart from the background patterned paper that it sits upon.  I used one of my favorite cursive fonts - Pacifico, to cut the remainder of the title out of vellum. 


I've had this Brutus Buckeye paper for a long time, and unfortunately can't remember who it's manufactured by.  It's the perfect compliment to this page, alongside the Jillibean football helmet sticker.

 
That's all I've got for today.  I've got soccer games to attend and a football game to keep tabs on! ;) Wishing you all a crafting weekend!  Go Bucks!

Saturday, June 14, 2014

LMT layout: patterned paper covered washi

Happy Saturday!  Hope you're weekend is starting off better than mine!  We had a boatload of plans for the day, but it looks like the stomach bug had other ideas. 

Fortunately, I've yet to be hit (knock on wood!) so in the meantime, I'm going to hide in my craftroom and scrap!  But before I do that, just wanted to pop on here and share my latest project for Love My Tapes.


Supplies used: Patterned Paper - Bella Blvd, Jillibean Soup, Making Memories; Washi Tape - Love My Tapes; Title: Silhouette store download file; Embellishements - Studio Calico wood veneers; Other: machine stitching, Veteran Typewriter font.
Here's a closer look at some of the pretty patterns going on, between both the papers and washi tapes I've used.

 
For more details on this page including all of the different ways in which I've included tape, head on over to this post on the Love My Tapes blog.
 
Hope to be back to share more soon (and with better news next time, too!) ;)


Monday, June 9, 2014

Jillibean Soup Guest Designer projects

If you haven't yet seen my prior post here, I was honored with title of 'Guest Designer' for the month of May for Jillibean Soup.  Since the remainder of my projects went live at the end of the month, I wanted to take the opportunity to share them here, as well. 

The following projects all feature Jillibean's newest Birthday collection 'Birthday Bisque'.  My motto is, you can never have enough birthday themed supplies - especially if they're Jillibean! ;).  This is one of my very favorite recent JBS collections and in turn, helped me produce some of my most favorite projects.  Let's start with the layout...


Supplies used: Jillibean Soup - Patterned Paper: Birthday Bisque/Bite Sized Bits, Cup of Candles; Spicy Social Soup/ Bite Size Bits; Soup Staples II/Yellow Salt; Homemade 6 Bean Soup/Navy Beans; Mini Placemats: Favorite; Peapod Parts: Birthday Bisque; Coordinating Label stickers: Birthday Bisque; Soup Labels: Birthday Bisque; Alphabeans: Mushroom Gray; Wood Sprinkles: Love; Stamps: Sweet & Sour Soup; Other - EK border punch, Veteran Typewriter font, Hero Arts black ink, foam adhesive, machine stitching, Silhouette.


The bite-sized bits paper was a favorite of mine.  I love all of the 3x4 cards and had trouble narrowing down which ones to use.  A quick grid design came to the rescue by allowing me to incorporate several of the cards alongside some mini placemats for an effective and colorful backdrop for my pictures and memories.

Next up was a birthday card.  I just loved this aqua and orange color combo, which included a pop of red.  Again, I used one of my favorites of the mini placemats, to work my design around.  Even with the addition of the mini heart, I think this card could work for either a male or female recipient.


Supplies used: Jillibean Soup - Patterened Paper: Birthday Bisque/Cup of Candles; Cold Avocado Soup/Ripe Avocados; Mini Placemats: Favorite; Peapod Parts: Birthday Bisque; Coordinating Label stickers: Birthday Bisque; Soup Labels: Birthday Bisque; Other - Lawn Fawn sequins, American Crafts twine, Doodlebug gems, vellum, foam adhesive.
The focus of this last card, is again a piece trimmed from the bite-sized bits patterned paper.  This time, I trimmed the card into a tag shape, punching holes at the top and threading on twine for added dimension.  It looks so cute 'adhered' to the card base with that mini colorful clothespin, don't you think?!


Supplies used: Jillibean Soup - Patterned Paper: Birthday Bisque/Bite Sized Bits, Pound of Party, Pint of Presents; Cold Avocado Soup/Ripe Avocados; Coordinating Label stickers: Birthday Bisque; Soup Labels: Birthday Bisque; Wood Sprinkles: Love; Other - Stampin Up scallop border punch, Studio Calico sequins, Pebbles clothespin, American Crafts twine, Doodlebug enamel dots, machine stitching, foam adhesive.

You can get another look at these projects over on the Jillibean Soup blog.

Happy Monday, friends!

Wednesday, May 14, 2014

Guest Designer and some news!

Hello there, crafty friends!  So sorry for my unexplained absence!  While I didn't intend to take such a long blog break -- as usual life got in the way!  More specifically, I've been focusing a little more on ME! Try to get my health in check, make exercise a priority and fortunately, I've been having GREAT results!  Yay!  That downside to that is though, rather than heading to my scrapbook desk in the evenings, I've been heading to bed early to catch some extra zzzz's and keep myself from any late night snacking while I scrap - lol!  Hopefully now that I'm three months into these healthier routines, the bad habits are kicked and I'll be around sharing things with you all more often.

Even though I haven't been posting, I've still been busy crafting.  In fact, I have some especially fun things to share today, that I've been keeping under wraps.

First off, is a Guest Designer stint that I was fortunate to land with Jillibean Soup.  I was sent a generous supply of items from the Sightseeing Stew and Birthday Bisque collections. 

Today on the Jillibean blog, my projects featuring Jillibean's wonderful new travel line are being shared.  The first thing I was itching to create with this collection was a scrapbook page with pictures and memories from our Summer trip to Seattle.


Supplies used: Jillibean Soup - Patterned Paper: Sightseeing Stew/Bite Sized Bits, Tossed Tickets, Blanched Bags, Poached Photos; Soup Staples II/Gray Salt; Peapod Parts: Sightseeing Stew; Coordinating Label Stickers: Sightseeing Stew; Soup Labels: Sightseeing Stew; Wooden Nickels: Birthday; Other: American Crafts cardstock, Doodlebug sprinkles, foam adhesive, Veteran Typewriter font, machine stitching
One of my favorite pieces from the entire Sightseeing Stew line was the 'Tossed Tickets' patterned paper.  Upon first look, I knew I wanted to cut the paper up, punch holes in the tops and thread string through the 'tickets' to create a fun, textural cluster on my page.


These cute labels were cut from the Bite Sized Bits paper and were the perfect home for my journaling.

 
An additional piece from the Bite Sized Bits paper, allowed for an quick short-cut to my title, and was easily embellished with a cute airplane diecut and wooden nickel button.


I couldn't stop with just the scrapbook page, and went on to create too additional cards.  This first card uses one of the Jillibean placemats (kraft circles) to highlight a variety of the patterns from the collection.


Jillibean Soup supplies used: Patterned Paper: Sightseeing Stew/Bite Sized Bits, Pickled Planes, Blanched Bags, Tossed Tickets; Soup Staples II/Yellow Salt, Gray Salt; Placemats: Kraft Simple Circles; Mini Placemats: Smile; Peapod Parts: Sightseeing Stew; Coordinating Label Stickers: Sightseeing Stew; Wood Sprinkles: Love; Other: machine stitching, foam adhesive
As you may have noticied the Peapod Parts are some of my favorite Jillibean items.  I seem to sneak them in to most of my recent projects!  The sweet little globe from Sightseeing Stew inspired the whole concept for this miss you card.


Jillibean Soup supplies used: Patterned Paper: Sightseeing Stew/Bite Sized Bits, Tossed Tickets, Blanched Bags; Homemade 6 Bean Soup/Navy Bean; Peapod Parts: Sightseeing Stew; Coordinating Label Stickers: Sightseeing Stew; Wise Words: White Sentiments; Cool Beans: Christmas; Other: Studio Calico wood veneer stars, American Crafts twine
The remainder of my guest designer projects will be highlighted on the blog next week, so I hope you'll come back to see them the (there might just be a little giveaway to go along with the post - hint, hint!!!).  They are some of my new favorite creations!

Oh, and did I mention some news?!  If you've been here before, you may have noticed that I added a new badge to my blog along the right hand side.  I'm happy to share that I've been selected to join the designers over at the newly re-launched Love My Tapes.


I shared a peek on instagram, at the LMT products that I'll be working with and will be back soon to show you how I've been putting all of that pretty tape to good use!

Thanks for stopping by and sharing in my excitement!

Sunday, February 16, 2014

Another quick Jillibean Soup card


Hi blog friends!  I am back again with a quick post today, to share another card I whipped up for the challenges posted on the Jillibean blog this weekend.  If you missed my first card post yesterday, you can find it here.

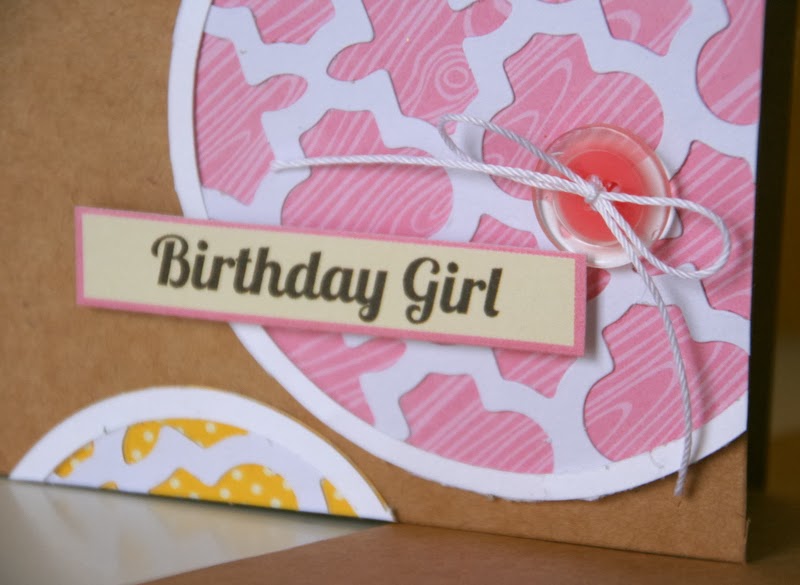
This time the challenge was to use Jillibean's placemats in a layout, card or project.  By the looks of this card, you might think I had enlisted the help of a fancy diecutting machine, but that is the beauty of the Jillibean placemats. That fancy lattice work is actually a premade 12x12 piece of diecut paper - the 'placemat'.  I cut it down to fit inside my white cardstock rings and then backed it all with different patterned papers. 


Supplies used: Jillibean Soup - placemats, patterned paper, buttons, soup label sticker; Other: kraft card and enevelope, crochet thread, tombow mono adhesive.
I cut off the ends of a soup label sticker, to better fit my card.  The addition of a Jillibean button tied with string adds just enough extra pop to draw your eye to the card's sentiment.

 
And a few more buttons ... just because I can't help myself and they are so darn cute!


Enjoy the rest of your weekend and come back and visit me again soon!

Saturday, February 15, 2014

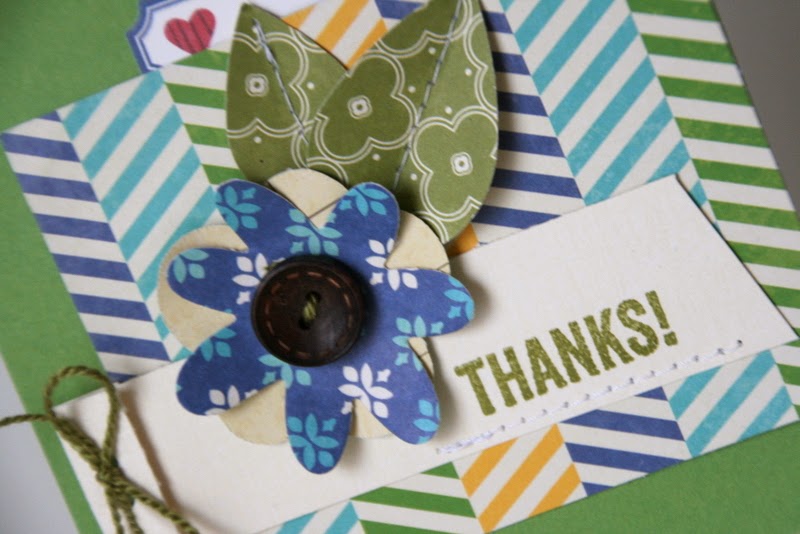
Quick thank you card

Happy Saturday!  We've had a busy day of shoveling, playing in the snow and kid's sports.  Somehow, I still managed to sneak in a little time to play along with one of the challenges on the Jillibean blog, though (and hope to keep working on them, when my littles are tucked into bed for the night!  Soon, soon!).
 
I derived inspiration for the layout of this card from sketch #1 that was posted on the blog on Friday.  I dug into my latest Jillibean favorite, Cold Avocado Soup, to whip together this quick card for a special friend!


Supplies used: Jillibean Soup - patterned paper, button, label sticker, stamped sentiment; Doodlebug - flower dies, enamel dots; Studio Calico - sequin; Stampin Up - ink, splatter stamp; Fiskars - punch; American Crafts - cardstock.

That sweet stamped sentiment is a Jillibean stamp from the Cold Avocado line.  I love the type-set and it stamps great with my small stash of Stampin' Up inks.


In the sketch there was a place for splatters along the top of the card.  I used a Stampin' Up stamp and ink to achieve the same look.  So, yeah, those are fake splatters!  You'd never know unless I told you, huh?  I love that the stamp allows you to have 'controlled' misting!  That's just perfect for my OCD-self! Ha!

 
Thanks for visiting today!  Hope you're stealing away some crafty time this weekend, too.

Wednesday, February 12, 2014

Channeling the summer heat

At this point in the season, I know I'm not the only one wishing for warmer weather and dreaming of sandy beaches, the sound of waves crashing and a pina colada in my hand, right?  The brutally cold temperatures we've been having, have me looking back through our summertime pictures to remember what it feels like to be outside in the warm air and sunshine! I fear I might have forgotten! And since, of course, I'm not caught up on printing and scrapping most of those pictures - now seems like the perfect time.  If nothing else, my mind will be in a warmer place than my body! Ha!

At the start of last summer, my kids and I sat down and created a 'summer bucket list'.  It included all the activities we hoped to participate in and things we wanted to accomplish.  By summer's end we still had a few items left on our to-do list that we wanted to squeeze in.  One was a bike ride on the local bike trail.  I had several pictures from this day, so they necessitated a two page spread.


Out for publication!  Be back soon!

I went through my stash of Jillibean products for this page.  Other than the oh-so-perfect bicycle patterned paper, I knew there were several other elements that I could mix and match to achieve a bright, summery look.  This sweet bicycle diecut from the pea pod part package, just HAD to be included.  I accented it with some diecut clouds and a fun little flag that looks as if it's carried along by the bicycle.

 
To tie in the second side of the page, I continued the journaling again accenting it with some favorite Jillibean diecut pieces.  I loved the cloud shapes in the pea pod parts so much that I ended up tracing them onto several other blue colored patterned papers, and cutting them out to use as additional accents.  A few additional embellishments, including the button and camera clip add interest and draw your eye throughout the page and pictures.


I hope this post finds you enjoying warmer weather than I, and if not, we can dream of the heat together as we scrap our summer memories, huh?  Desperate times call for desperate measures! LOL!

See you soon!

Thursday, December 5, 2013

December Daily: Dec 1st, 2nd, 3rd

For the past several years I have attempted a December Daily album.  A couple of them have gotten no further than the album construction or cover design.  Except for last year's attempt which progressed the furthest of any other -- at nearly halfway done.  (*For the record, I still plan to eventually go back to that 2012 album and complete it!  If you're curious, I shared some of the foundation pages in this post.). 

So, why in the world am I attempting this project again, when I've been so unsuccessful in the past?!  Well, looking back at just the handful of pages I created for 2012 reminded me what a cherished keepsake this is.  There is so much happening during the month of December that I want a way to capture and remember the little bits and pieces, that often get lost over the years.

Today I'm sharing the first of my completed pages - the cover through December 3rd.  I'm using a Studio Calico Handbook album, which to this point I've left raw.  I'm still undecided if I will paint the chipboard cover and thus have waited to add any additional design to it.  While I'll be using lots of items in my crafty stash, the majority of the elements are from Jillibean Soup's Christmas Cheer Chowder collection.

For the cover page I tried to incorporate many of the elements that I would repeat throughout the album - sequins, diecuts, woodgrain, stamping.


Supplies used: album - Studio Calico, patterned papers, diecuts, stickers - Jillibean Soup; woodgrain paper - Pebbles; snowflake punches - Martha Stewart; sequins - Lawn Fawn; gold epoxy dots - SEI; stamps - Ali Edwards for Technique Tuesday; ink - Stampin' Up
As you can see the title page features lots of layered snowflakes and sprinkles of glitter and shine.  It all translates as very Christmas-y, don't you think?

 
Since I had the backside of the title page to work with for the first of December, I used the 6X8" canvas in it's entirety to focus on my title for the spread.  On this day, my boys and I tagged along with my sister and her family to cut down their Christmas tree.  I had lots of pictures to included, but didn't want to divide up the spread with a full page, in between.  So, I cut one of the 3X4 pocket pages in half vertically to allow for additional photos but cohesiveness throughout the spread.


Here is a look at the page again, when the 3X8" photo section is flipped to the left.

 
For December 2nd, I was again working with a 6X8 page protector, so I chose to create a mini scrapbook layout.


I love the little diecuts that coordinate with the Christmas Cheer Chowder collection.  I knew I just had to use this sweet little elf on a page accompanying pictures of our Elf on the Shelf.

 
Originally I had stamped and punched a series of numbers for each of the 25 days in December.  Unfortunately, I couldn't get them to work with my overall design.  So, I reevaluated and decided to cut and use the Jillibean paper that includes squares of all the numbers I will need plus more.  I pretty much love how they look throughout the album so far!
 
 
I'm off to put the finishing touches on Dec 4th, and print out my pictures for today.  Feels good to be almost caught up with this project.  I'm having so much fun doing it and really enjoying the season more by focusing on these little memories and blessings.  See you back here soon with more!