Gams

Wednesday, June 27, 2012

Summertime Fun and Two Favorite Girls

Unfortunately, my blogging has gone the way of my scrapping lately - MIA! The kiddos and I have been so, so busy with a mountain of summertime activities, that by the time they are nestled into bed and I have a moment to scrap, I'm typically off to dreamland as well!  I wouldn't say we are having too many 'lazy summer days' just yet, but we sure are having a lot of fun and building lots of memories!  Just in the few short weeks that we've been on summer break we've: been to Kings Island (twice), gone strawberry picking, cheered on the Reds at Great American ballpark, visited the animals at the Columbus Zoo, sampled several new ice cream shops, swam at the Y pool, had a swim date with cousins at their local community pool, rode bikes, had a sleepover, enjoyed camp days at the Little Gym, had lots of backyard water fun, and have been reading nonstop to earn rewards through the libraries summer reading program.  Whew!!!!  I'm thinking I might relax again when school starts! LOL!

Even though, I haven't had much time for crafting, I have a few pages to share, over the next several days, that I worked on prior to my scrapping hiatus.  I recently had this page featured over on the Basic Grey blog and am anxiously awaiting my prize package in the mail!  :)  I snapped these photos on Easter of my mom and baby girl -- they are some of my favorites!  As you'll see, I succumbed to the chevron craze and created my own chevron background with the 'B sides' of several papers from Basic Grey's Picadilly collection.


To create this pretty accent, I traced a chipboard butterfly shape onto white cardstock, stamped it in versamark with a dotted background stamp and heat embossed it with white embossing powder for a subtle, but pretty tone on tone effect.


I couldn't call the page complete without some (okay, A LOT!) of machine stitching - and chose to accent all of the chevrons with a bit.  I also had fun testing out a new Stampin Up floral die that I had recently purchased - to sprinkle embellishments throughout the page.


So, just a quick share today.  Hoping to be back soon with more!  Thanks, as always for stopping by!

Tuesday, May 29, 2012

Celebrating 50 years

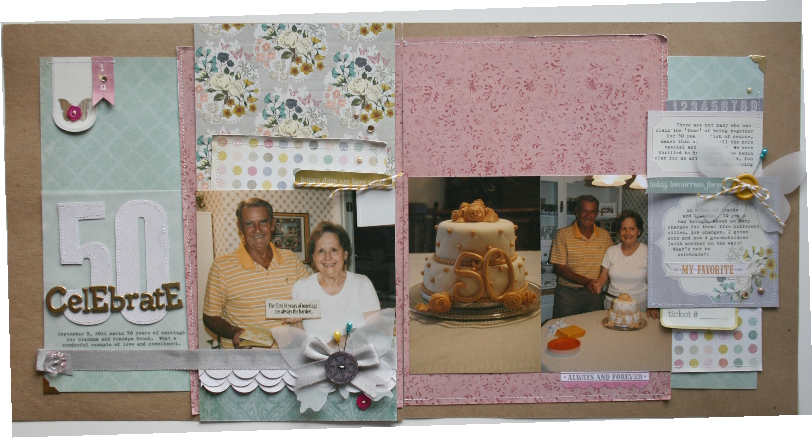
There are not many couples who can claim the title of being married for 50 years.  However, my in-laws are now official members of that 'club'!  We helped them celebrate this momentous occasion back in September 2011 by gathering close family and friends for dinner, reminiscing and celebrating.  The beautiful florals and patterns in the My Mind's Eye Miss Caroline 'Fiddlesticks' collection, were the perfect compliment to photos from the day.

Supplies used: Paper: My Mind's Eye Miss Caroline 'Fiddlesticks' collection: "Lucky" Tapestry (1), "Story" Plaid (1), "Home" Dotted (1), "Love" Journal (1); Cardstock: Bazzill; Embellishments: My Mind's Eye Miss Caroline 'Fiddlesticks' collection: "Lucky" twine, and "Love" pins and buttons, Hero Arts earth mixed pearls and gem; Other: computer font, machine stitching, embroidery floss, ribbon, scallop border punch, chipboard letters (title), vellum, photo corners 


I really loved all of the miscellaneous buttons and stick pins that came with this collection and used nearly all of them up to decorate these pages.  It seems I am rediscovering vellum again, in my scrapbooking, and used it to cut pretty butterflies for both pages.


Here's a closer look at the page title.  I used American Crafts raw chipboard letters to spell out the word celebrate and embossed them with gold embossing powder to compliment the theme of the page.  I love the vintage feel it gives to the letters.


The close up of this page, shows the AMAZING cake that my friend Beth made for the occasion.  Doesn't she do wonderful work?  If you are local and need a cake, you should definitely check out her facebook page - Busy B's cakery.  


Do you spy another vellum butterfly here?  I told you I'm hooked on vellum again!  I topped off this butterfly with a cute button, twine and another of the darling stick pins, from this collection.


Hope everyone had a great holiday weekend!  I'll be back soon with more to share.


Thursday, May 24, 2012

Mother's Day mini and some fun news

Now that the holiday is officially past and gifts have been given, I wanted to share the cute little mini books I put together for both my mom and mother in law for mother's day this year.  The album measures a little more than 4" x 4", so it's the perfect size for these Grandma's to pop in their purses and always have on hand, to share photos of their darling grandchildren!  For the contents of the album I selected some favorite photos of my kiddos and paired it with text, that answers a couple of 'interview' questions that I asked them about their Grandma and Nana.  Here's the look at the cover:


And a side view of the album, shows how it is kept closed with a length of twill tape.  I love from this view, how you can see all of the bits and pieces of each page peeking out - and hint at what's to come inside!


As you will see, I laid out the album to include a picture of each child on the left page, and their response on the right.  In the middle of each page, I sewed a small envelope into the book binding, which when opened, reveals a sweet little drawing from them.  I started the book with a picture of my oldest.


Here is a look at the page once the pocket page is turned.


Again the next set of pages is set up with the same 'formula' - picture, pocket, then text.


A close up reveals how the envelope opens, and shows a peek at the paper, containing Justin's sweet little artwork, inside.


The backside of the envelope and his response to my questions are shown here.  I love the he said he loves his Nana because, "she teaches me tricks." Ha, ha - funny boy!


Next, is baby girl's page.  Obviously, she is not quite at the age to create artwork yet so, I chose to use a decorative envelope here.  I punched some 'confetti' from paper scraps (as is all the rage in scrapbooking right now!), tucked it inside a vellum envelope and sewed it shut.  I think it adds a fun little decorative element!


I gave baby girl a little help with her 'interview', as well! (wink!)


For the final pages, I mixed up the 'formula' a little bit.  I include some decorative elements on the left, sewed a vellum envelope into the binding and finished it off with a group photo of all three kids.


This picture reveals the contents of the vellum envelope -- sweet little mini instax photos of each child!  Love this!  I was thrilled when I figured out that the envelope was the perfect size to contain these!


Here's a look at the final page:


To finish off the back side of the album I stamped a sweet little phrase, from an older Hero Arts Stamp set and added a remaining sticker.  


As you can imagine, these little albums were quite a hit with the Grandma's! My only regret is not making a copy to tote along in my own purse!


Oh, and before I sign off -- just wanted to share my fun news.  I found out yesterday that a recent page, shown in this post, won the latest sketch challenge over at the Jillibean Soup blog.  Yay, me!  If that wasn't enough -- my prize was to select $50 worth of items of my own choosing from the online Jillibean store.  How fun is that????  I had so much fun shopping with my Jillibean dollars.  Maybe when I get my package in the mail, I'll snap a pic and share my goodies!

As always, thanks for stopping by!


Sunday, May 6, 2012

National Scrapbook Day

Happy (one day belated) National Scrapbook Day to all of my crafty friends out there!  And for all those friends and family who read my blog - what do you mean, you didn't know that this was an actual holiday?  Mark it on your calendars for next year  -- I'll expect a phone call! ;)

Not that I needed another excuse to find some time to scrapbook, but having a holiday centered around my favorite hobby, certainly gave me one yesterday.  I was lucky to steal away a couple of hours in my crafting space to participate in a few of the challenges and festivities that many companies had posted online.  (Big thanks to my hubby for corralling the kiddos during that time!  Thanks, babe - smooches!).  Echo Park hosted a number of challenges on their blog throughout the day and I was excited to play along with a couple of them.  The first was to put together a card, using any of their products, in under two hours. I already had some of their 'Note to Self' line out on my desk and typically can crank out a card in under 30 minutes, so participation in this challenge was a no brainer.  Here's the results, featuring one of my favorite quote stickers from this collection:


Supplies used: Kraft cardstock, Echo Park's Note to Self Collection papers: Arrows and Red Dots, and Elements Stickers.  Other: ribbon and Jillibean woodgrain epoxy button.


It's a bit hard to see in the photograph, but I added glittered stickles to the top edge of the word 'icing' to mimic the dripping of actual icing.

Another of Echo Park's challenges required that you 'scraplift' one of the design team members projects posted on the blog.  I drew inspiration from a page by design team member, Leslie Ashe.  She titled her page 'Happy Days' which was also the name of the Echo Park paper collection that she used for the layout.  I was inspired to do the same, only using the aforementioned 'Note to Self' collection.


Supplies used:  Echo Park's Note to Self collection Alpha Stickers, Elements Stickers and papers: Red Dots, Quotes, Arrows, Inventory, Stripes.  Other: Jillibean baker's twine, jute, foam adhesive, date stamp, machine stitching, computer font and 'clock' brad from Echo Park's This and That Charming decorative brad pack.

A closer look at the title and journaling, and that cute little hand sticker.  As you can see, I added a baker's twine bow to the pointed finger to denote the idea 'reminding myself'.  When you read the journaling, you will see why the office/business feel of this line, worked so well with my goofy pictures. :)


There was a whole sheet of paper in this collection that featured these fun inventory tags.  I loved the idea of cutting out some of the individual tags to act as embellishments.


That's it for tonight, friends.  I've got lots more to share, so come back and visit me soon!

Friday, April 27, 2012

Jillibean April sketch and button challenge

This is my second post for the day, so if you're just stopping by, make sure you continue to scroll down!  Two in one day - pretty crazy, huh?  I just have so many new projects that I want to share, I simply couldn't help myself!

This first page is based upon the sketch challenge for the month of April, that Jillibean Soup hosts on their blog each month.  I tried to copy and paste the sketch here for you to see, but for some reason, I couldn't get it to format properly.  If you are interested in the original sketch, however, click here for the original blog post about it.  I used up lots of Spotted Owl Soup goodies on this page.  I don't think the color scheme of this birthday themed line, could have been any more perfect for the pictures of my birthday boy, don't you agree?


Supplies used: Bazzill Cardstock, Jillibean Soup's Spotted Owl Soup collection papers: 3 Dancing Hats, 5 Totally Fun Tunes, 2 Cups of Confetti,  and the coordinating cardstock stickers, Embellishments: Doodlebug  Boutique Buttons, Jillibean Bean Stalks twine, Target dotted tape, Stamps: Doodlebug/Hampton Art Birthday stamps, Other: foam adhesive, machine stitching, computer font, colored pencils, gamsol, chipboard photo corners
 I loved the letter stickers that coordinated with this collection, but I was worried if I used them alone, they would get a bit lost on that blue and white small polka dotted background paper.  So, to give them a bit more dimension and emphasis, I layered and slightly offset them over top the same set of letter stickers in a coordinating blue color.  I love how this simple trick gives the title a great appearance on the page.  The stamped and colored presents are just another fun touch to the title, and enforce the them of the page.


I printed the journaling on a banner dividing the photos on the page, and added some additional embellishment to it with baker's twine and stickers.


Along with their sketch challenge this month, Jillibean also issued a challenge on their blog to use buttons.  Considering the fact that I can't seem to call a project complete without adding at least one button on it somewhere, I couldn't help but participate in this one, as well.  I dipped into my stash of Coconut Lime Soup papers for this page, and created a rainbow of embellished hearts along the left side. 

This is a new favorite photo of me and my little man! ;)

Supplies used: Jillibean Soup Coconut Lime Soup collection papers: Bite Size Bits, Straw Mushrooms, Kaffir Lime Leaves, Chile Paste, Coconut Milk, Cumin, Jillibean's Neopolitan Bean Bisque Soup collection papers: Parmesan Cheese Curls,  Jillibean's Sweet and Sour Soup collection paper: Shredded Cabbage; Embellishments: Jillibean decorative stick pin, Bean Stalks baker's twine, Coconut Lime epoxy woodgrain buttons, Alphabeans letter stickers, Happy Birthday Soup labels, Other: machine stitching, embroidery floss, computer font

I loved the saying on this little label that I cut from the 'Bite Size Bits' paper.  To put the emphasis on the sun, I stitched along the rays and cut one of the woodgrain epoxy buttons in half to mimic its center.


The journaling was printed on an older Jillibean diecut that I had leftover from the 'Dutch Mustard' collection.  Since I wanted to keep the design clean and organized with all of the different patterns and colors going on, I tucked my journaling card behind my photo, just letting the top edge of it peek out.  You can see in this picture, I used another of the large epoxy buttons on the yellow heart and again, cut right through it to maintain the shape and curve of the heart.


Thanks for letting me share all of the fun I've been having with my Jillibean stash!  See you soon!


Jillibean cards

Good morning!  I'm just popping on real quick (since I should be folding laundry, unloading the dishwasher, making beds, etc!) to share a few cards I just finished up last night.  I have been working on some pages with some Jillibean Soup that I can't wait to share.  I won a random little giveaway on their blog a couple of weeks back, and they sent me one of each sheet of paper from their new collections.  Yay, me!  I decided that I had admired and looked over the paper long enough and it was finally time to cut into and make some pretty things! 

While cleaning up my desk area from the aforementioned pages (which will be shared once the lighting gets better here and I can snap some decent pictures), I just couldn't put away all of the fun little bits and paper scraps.  So, what better to do with them, than make a few cards.

The first card is a smaller size - around 3.75"x5.25".  I made it for no particular occasion, other than I loved the little strawberry image.  Most all of the supplies used on this card are from Jillibean's Coconut Lime Soup collection.


Using up more of my Coconut Lime Soup scraps, I put together this quick birthday card.  I dug into my embellishment stash for the Jillibean stick pin, and I just love those Jillibean label stickers -- this one I mounted onto the card front with foam adhesive.


Some of the Coconut Lime Soup papers coordinated with diecuts from an older Jillibean line, Dutch Mustard Soup, that I just happened to having lying out as well.  I built this all on top of a Doodlebug create-a-card.  Love the bright colors on this one!


And one last share, a quick thank you card, to round out the bunch.


Well, no more neglecting the household - I must get to work (at least for now!).  Thanks for stopping by, as always!

Thursday, April 26, 2012

Signs of Spring

When I'm asked to name my favorite season, in the past, I've not often mentioned Spring.  I guess it's mostly because of the increasing quantity of gloomy, rainy days -- neither of which are good for my frizzy hair or my day's outlook!  However, looking back over some springtime pictures from last year, I am quickly reminded of the beauty that often results from those frequent showers.  So, I chose a series of photos to highlight some of my favorite springtime scenes.  Teresa Collin's Spring Fling was the perfect backdrop for these pictures.

p
Supplies used: Paper: Teresa Collins Spring Fling collection: Mixed Brocade (both sides), Paisley (both sides), Big Dots (both sides) Cardstock: Bazzill Diecuts: Teresa Collins Spring Fling Diecut Sheet Embellishments: Teresa Collins Spring Fling Rhinestones, Teresa Collins Fabrications Brads, Making Memories buttons Other: vellum, computer font, machine stitching, ribbon, embroidery floss, October Afternoon Sprinkler (buttermilk), circle cutter

I printed the journaling onto one of the diecut cards from the coordinating diecut sheet.  I also dressed up many of the butterflies centers throughout the page with gems, pearls and decorative brads that matched the papers.


For my title, I again took advantage of one of the premade diecut strips, cut it into a banner and nestled it in with some of strips of paper that were rimmed to banner shapes, as well.  I love all of the beautiful patterns in this line, as well as the unexpected color combination, and couldn't bare to leave any of them off this page.


As, I sometimes like to do, I whipped together a quick card with some of the leftover pieces lying on my desk; using up many of the remaining diecut pieces.  A sweet, but generic sentiment allows for this card to work for any number of occasions.


Supplies used: Paper: Teresa Collins Spring Fling collection: Big Dots Cardstock: Bazzill Diecuts: Teresa Collins Spring Fling Diecut Sheet Embellishments: Teresa Collins Spring Fling Rhinestones, Teresa Collins Fabrications Brads Other: foam adhesive, machine stitching
Thanks for visiting me today!  I've been working on a whole slew of baby pages (imagine that!), so I'll be back soon to start sharing those too.