Gams

Friday, April 27, 2012

Jillibean April sketch and button challenge

This is my second post for the day, so if you're just stopping by, make sure you continue to scroll down!  Two in one day - pretty crazy, huh?  I just have so many new projects that I want to share, I simply couldn't help myself!

This first page is based upon the sketch challenge for the month of April, that Jillibean Soup hosts on their blog each month.  I tried to copy and paste the sketch here for you to see, but for some reason, I couldn't get it to format properly.  If you are interested in the original sketch, however, click here for the original blog post about it.  I used up lots of Spotted Owl Soup goodies on this page.  I don't think the color scheme of this birthday themed line, could have been any more perfect for the pictures of my birthday boy, don't you agree?


Supplies used: Bazzill Cardstock, Jillibean Soup's Spotted Owl Soup collection papers: 3 Dancing Hats, 5 Totally Fun Tunes, 2 Cups of Confetti,  and the coordinating cardstock stickers, Embellishments: Doodlebug  Boutique Buttons, Jillibean Bean Stalks twine, Target dotted tape, Stamps: Doodlebug/Hampton Art Birthday stamps, Other: foam adhesive, machine stitching, computer font, colored pencils, gamsol, chipboard photo corners
 I loved the letter stickers that coordinated with this collection, but I was worried if I used them alone, they would get a bit lost on that blue and white small polka dotted background paper.  So, to give them a bit more dimension and emphasis, I layered and slightly offset them over top the same set of letter stickers in a coordinating blue color.  I love how this simple trick gives the title a great appearance on the page.  The stamped and colored presents are just another fun touch to the title, and enforce the them of the page.


I printed the journaling on a banner dividing the photos on the page, and added some additional embellishment to it with baker's twine and stickers.


Along with their sketch challenge this month, Jillibean also issued a challenge on their blog to use buttons.  Considering the fact that I can't seem to call a project complete without adding at least one button on it somewhere, I couldn't help but participate in this one, as well.  I dipped into my stash of Coconut Lime Soup papers for this page, and created a rainbow of embellished hearts along the left side. 

This is a new favorite photo of me and my little man! ;)

Supplies used: Jillibean Soup Coconut Lime Soup collection papers: Bite Size Bits, Straw Mushrooms, Kaffir Lime Leaves, Chile Paste, Coconut Milk, Cumin, Jillibean's Neopolitan Bean Bisque Soup collection papers: Parmesan Cheese Curls,  Jillibean's Sweet and Sour Soup collection paper: Shredded Cabbage; Embellishments: Jillibean decorative stick pin, Bean Stalks baker's twine, Coconut Lime epoxy woodgrain buttons, Alphabeans letter stickers, Happy Birthday Soup labels, Other: machine stitching, embroidery floss, computer font

I loved the saying on this little label that I cut from the 'Bite Size Bits' paper.  To put the emphasis on the sun, I stitched along the rays and cut one of the woodgrain epoxy buttons in half to mimic its center.


The journaling was printed on an older Jillibean diecut that I had leftover from the 'Dutch Mustard' collection.  Since I wanted to keep the design clean and organized with all of the different patterns and colors going on, I tucked my journaling card behind my photo, just letting the top edge of it peek out.  You can see in this picture, I used another of the large epoxy buttons on the yellow heart and again, cut right through it to maintain the shape and curve of the heart.


Thanks for letting me share all of the fun I've been having with my Jillibean stash!  See you soon!


Jillibean cards

Good morning!  I'm just popping on real quick (since I should be folding laundry, unloading the dishwasher, making beds, etc!) to share a few cards I just finished up last night.  I have been working on some pages with some Jillibean Soup that I can't wait to share.  I won a random little giveaway on their blog a couple of weeks back, and they sent me one of each sheet of paper from their new collections.  Yay, me!  I decided that I had admired and looked over the paper long enough and it was finally time to cut into and make some pretty things! 

While cleaning up my desk area from the aforementioned pages (which will be shared once the lighting gets better here and I can snap some decent pictures), I just couldn't put away all of the fun little bits and paper scraps.  So, what better to do with them, than make a few cards.

The first card is a smaller size - around 3.75"x5.25".  I made it for no particular occasion, other than I loved the little strawberry image.  Most all of the supplies used on this card are from Jillibean's Coconut Lime Soup collection.


Using up more of my Coconut Lime Soup scraps, I put together this quick birthday card.  I dug into my embellishment stash for the Jillibean stick pin, and I just love those Jillibean label stickers -- this one I mounted onto the card front with foam adhesive.


Some of the Coconut Lime Soup papers coordinated with diecuts from an older Jillibean line, Dutch Mustard Soup, that I just happened to having lying out as well.  I built this all on top of a Doodlebug create-a-card.  Love the bright colors on this one!


And one last share, a quick thank you card, to round out the bunch.


Well, no more neglecting the household - I must get to work (at least for now!).  Thanks for stopping by, as always!

Thursday, April 26, 2012

Signs of Spring

When I'm asked to name my favorite season, in the past, I've not often mentioned Spring.  I guess it's mostly because of the increasing quantity of gloomy, rainy days -- neither of which are good for my frizzy hair or my day's outlook!  However, looking back over some springtime pictures from last year, I am quickly reminded of the beauty that often results from those frequent showers.  So, I chose a series of photos to highlight some of my favorite springtime scenes.  Teresa Collin's Spring Fling was the perfect backdrop for these pictures.

p
Supplies used: Paper: Teresa Collins Spring Fling collection: Mixed Brocade (both sides), Paisley (both sides), Big Dots (both sides) Cardstock: Bazzill Diecuts: Teresa Collins Spring Fling Diecut Sheet Embellishments: Teresa Collins Spring Fling Rhinestones, Teresa Collins Fabrications Brads, Making Memories buttons Other: vellum, computer font, machine stitching, ribbon, embroidery floss, October Afternoon Sprinkler (buttermilk), circle cutter

I printed the journaling onto one of the diecut cards from the coordinating diecut sheet.  I also dressed up many of the butterflies centers throughout the page with gems, pearls and decorative brads that matched the papers.


For my title, I again took advantage of one of the premade diecut strips, cut it into a banner and nestled it in with some of strips of paper that were rimmed to banner shapes, as well.  I love all of the beautiful patterns in this line, as well as the unexpected color combination, and couldn't bare to leave any of them off this page.


As, I sometimes like to do, I whipped together a quick card with some of the leftover pieces lying on my desk; using up many of the remaining diecut pieces.  A sweet, but generic sentiment allows for this card to work for any number of occasions.


Supplies used: Paper: Teresa Collins Spring Fling collection: Big Dots Cardstock: Bazzill Diecuts: Teresa Collins Spring Fling Diecut Sheet Embellishments: Teresa Collins Spring Fling Rhinestones, Teresa Collins Fabrications Brads Other: foam adhesive, machine stitching
Thanks for visiting me today!  I've been working on a whole slew of baby pages (imagine that!), so I'll be back soon to start sharing those too. 

Wednesday, April 25, 2012

SEW many ideas

I will start this blog post with a little confession: I officially admit to having scrapbooking on the brain quite often, during the typical day.  Okay, who am I fooling -- it's probably more like ALL.THE.TIME!  I know, you're surprised, right?!  Who would've guessed it?  ;)  I just can't help myself -- I'm constantly running across things that inspire me: a new favorite photo, fun new scrapbooking goodies, something funny my kids say or do, a page/card I see online or in a magazine, an interesting color combination, etc.  The sources for inspiration are just endless!  Fortunately, pinterest has allowed me to catalog and organize many of the ideas I run across on the Internet, that would otherwise completely be lost in my memory bank.  Have you checked out pinterest yet?  If not, be prepared to devote a couple hours on your first visit!  It is a complete time suck, but oh so much fun, too!  You can look here to view and follow my pinterest boards

Beyond the Internet, however, I needed a way to store and organize additional ideas on paper.  A notebook, of sorts, that I could sketch in, make lists, add pictures, carry coupons -- and one that I could easily store and take with me in my purse (or gigantic diaper bag, as it currently stands!).  So, along came the idea for this sweet little thing:


Supplies used: Paper - My Little Shoebox Sew Cute collection:  Sew Crafty,  Nothing But Buttons, My Little Shoebox Farmer's Market collection: Cherries Jubilee, Lettering: Doodlebug glitter letter stickers and Simply Sweet rubon alpha, Diecut: My Favorite Things label die,  Embellishments: Making Memories mini safety pin, My Mind's eye stick pin, Doodlebug Design baker's twine, Other: eyelet, ribbon, embroidery floss, machine stitching, computer font, buttons, 8x8 page protector, glossy accents, Stampin' Up scallop border punch.

I created the whole thing from scratch, using a piece of chipboard for the base.  Pretty cute, isn't it?  I think it may have something to do with that darling paper line from My Little Shoebox.  I've been hoarding a few pieces of it for quite some time and finally found just the right project to use it on.  Here's a close up of the title label.  As you can see, I put my sewing machine to good use on this little project -- it went perfect with the theme of the book, after all!


I had so much fun decorating and adding dimension to all of the little diecut pieces that I cut from the 'Sew Crafty' patterned paper.  To make the bobbins more dimensional and realistic, I added embroidery floss, ribbon, buttons and paperclips in coordinating colors.  I even pulled out an eyelet to add a realistic looking hinge to the scissors, and covered the heart shaped button piece with glossy accents to mimic a real button.  I adhered all of these elements with a strong adhesive, to ensure that they stay put as this little book get pulled in and out of my bag, a countless number of times.


Here's a look at the inside.


A little pocket at the start of the book, provides a nice spot for storing coupons, pages torn from a magazine or any other extras I want to hang on to.  I used the cute pink ruler that I cut from the 'Sew Crafty' paper to distinguish the pocket's opening and couldn't resist adding a little stick pin for decoration, as it again, coordinated so nicely with the sewing theme!


For even more storage space, and a little extra fun, I folded a 8x8 page protector in half and sewed it into the binding.  This creates two extra 'see through' pockets at the front and back of the book.  I like that it, once filled with items, will provide a bit of a 'peek-a-boo' element to the decorative divider that sits behind it.  I again, gussied up the dress form on the following page, that I cut from the 'Sew Crafty' patterned paper, with ribbon, a button and machine stitching.


Here is the backside of that dividing page:


At the back of the book, I added a spot to house a pad of paper for additional note taking, sketching, list making, etc.  Rather than adhering the backside of the notepad directly to the book, I cut a slit in the patterned paper, so that I could remove the notepad once full, and replace it as needed, in the future.


Seeeeewwww, that's my fun project share for today!  I've already quickly begun to fill this little book up with loads of ideas and inspiration for my next scrapping session.  Thanks for stopping by!  I'll be back soon with some more layout shares. :)


Saturday, April 21, 2012

More Simple Stories

I mentioned in this post, awhile back, that I would soon be featuring a page with Simple Stories Aweso(ME) collection.  Well, the page got completed, but life got in the way of blogging about it! ;)  Lucky for us, the weather has just been too warm and beautiful here to be wasting time indoors and on the computer.  The forecast for the weekend looks much cooler and rainy, though -- so maybe I'll get a bit of scrapping done and even a new blog post or two!


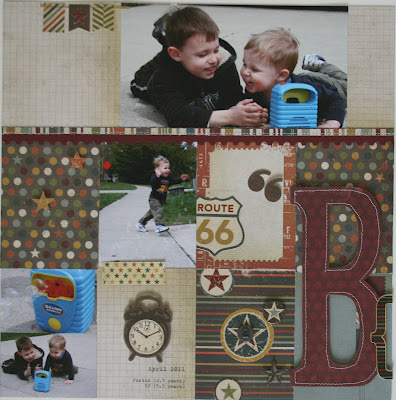
Anyway, on with the page and the pictures!  I simply LOVED this new line from Simple Stories from the moment I saw it!  I knew I had loads of pictures to compliment the masculine color scheme and boy themed images in the line.  I selected some of my favorite pictures of my two boys, enjoying some outdoor fun, last spring.  The large photo is one of my all time favorites -- I just love their sweet, joyful expressions over the glee of a simple new bubble machine.

Supplies used: Paper: Simple Stories AwesoME collection: Red Dot/Grid (both sides), Totally Cool, 100% Boy (both sides), Awesome Flash Cards (both sides) Cardstock: Bazzill  Stickers: Simple Stories Awesome Fundamentals Cardstock Stickers Embellishments: Jenni Bowline Decorative Brads Numbered, My Mind's Eye Miss Caroline twine, Bo Bunny large chipboard letter sOther: machine stitching, computer font, foam adhesive, postage edge border punch
 
There were so many cute images on the 3x4 cards, that I couldn't help but use a whole slew of them.  That lone factor helped me to determine the design of the page, and set up a grid of papers and pictures for the bottom two-thirds of the two page spread.  Here's a closer look at each individual page:


The thin striped paper border provided a nice way to tie all the colors across the two pages and also make a break in the page to separate the focal photo and journaling.  I used the grid paper along the top third to balance out the busyness of the bottom of the page and provide a nice neutral backdrop for the journaling.  


You can see from the detailed pictures that I used LOTS and LOTS of the coordinating stickers from the line.


Despite all that's going on, on this page, I had lots of leftovers.  I put together a fun card with some of them, that would work just perfectly for special boy!  I decided to keep the sentiment neutral, so that I could use it for any number of occasions.

Supplies used: Paper: Simple Stories AwesoME collection: 100% Boy, Awesome Flash Cards Cardstock: Bazzill Stickers: Simple Stories Awesome Fundamentals Cardstock StickerOther: My Mind's Eye Miss Caroline twine, Tsukineko black ink, Technique Tuesday stamps, black embossing powder


Thanks so much for stopping by!  I'll be back soon with an altered project share!