Gams

Showing posts with label Scrapbooking. Show all posts

Sunday, January 10, 2016

My Creative Scrapbook Layout: Dance Forever & Disney

Happy Sunday,  I hope you are enjoying the last bit of your weekend!  We got our first official snow of the winter and have been thoroughly enjoying it!  We spent the morning watching it fall out our windows, then bundled up and played in it after lunch.  Now we're inside again warming up with cocoa.  Pretty perfect Sunday, if you ask me!  It would be completely perfect if I could squeeze in a little scrapbooking time, so that is next on the agenda!

But before I do that, I thought I'd share with you, the last of the two pages I put together with My Creative Scrapbook's January Main kit.

One single, sweet diecut was the inspiration for this page.  See the round 'dance forever' diecut in the bottom right corner of my page?  Right when I saw it, it reminded me that I was still waiting on the perfect product to scrap my little girl's dance pictures.


The 3x4" Happy Place collection brag cards and diecut pieces were my favorite parts of the kit.  In fact, the brag cards made for a quick and easy grid style layout to my page.  They were the perfect surface to add bits of my journaling, extra embellishment and layers.


The last page I created from the kit, makes a bold statement using the diecut letters as both my title and background.

 
I just couldn't resist those letters!  The font and the colors are just perfection and both paired nicely with some of my favorite family Disney memories.  While this page has no real title - the page theme is clear, by the words used to 'mat' my photos.


Again, I snuck in more diecuts and button embellishments to accent my page.


 Thanks for joining me today!  I hope the rest of your weekend is cozy and crafty!
 

Wednesday, January 6, 2016

My Creative Scrapbook Layout: A Perfect Snap

As promised, I'm back today with one of the layouts I created for my guest stint over at My Creative Scrapbook

If you have children or at the very least, have tried to take a picture with 2 or more, you know what a challenge it can be.  It's darn near impossible to get everyone smiling, happy and looking at the camera at the same time, am I right?!  That 'perfect snap' is my one and only wish each Mother's Day, and as you can see, it's often hard to come by.  But the outtakes are part of the memory, so I thought they would be fun to include on this page.


The Fancy Pants 3x4 Brag card made for the perfect title for my page, even if it hints at a bit of sarcasm!  The quotations reinforce the tongue and cheek nature of my title, in addition to the added text I included by running the 3x4 card through my printer.


This paper collection includes so many great diecuts that I tried my best to squeeze in as many as I could.  Layering the diecuts among the 3x4 cards, photos and themselves ties all of the elements of the page together and gives them each a home.


Thanks for stopping by today!  I'll be back again tomorrow with another kit page to share!
 

Wednesday, October 21, 2015

Adventures Ahead: A DCWV DT Page

The warm temperatures and sunshine are long gone, and that of course, has me wishing I could have the lazy days of summer back!  Since that's not possible, I've been busy reminiscing through our summer photos.  In doing so, I ran across these pictures of my little girl riding her bike.  I instantly thought of DCWV's Hello Darlin' stack and knew they would be a perfect match - both in color and in theme!


Supplies used: DCWV Hello Darlin' stack; American Crafts cork heart stickers and twine; Kerri Bradford Studio stamps and cut files; My Mind's Eye flair; Heidi Swapp glitter stickers; Crate Paper gold clip; Becky Higgins Project Life date stamp; Studio Calico wood veneer; Other: Stampin Up scallop border punch, Veteran Typewriter font, Hero Arts ink pad.
I built my entire page around the subtle horizontal pink and white stripe paper.  The text, near the top of this particular page, made for an obvious and easy page title.

I knew I'd need a pop of bright pink on the page and this pattern from the stack, did just the trick.  I cut it down to 3X4" and embellished it with a foam mounted word diecut and a gold embossed stamped sentiment, both designs from Kerri Bradford.
 

The kelly green and gold polka dotted pattern is my favorite from the whole stack.  I couldn't leave the page alone, without sneaking a bit of this pattern on there somewhere.  Again, I trimmed the patterned paper piece to 3X4" and embellished it with a clip and some flair.  Additional layers to the left, create some added interest and depth.
 

There was no way I could finish this page without using the remainder of the pink and white striped pattern, which includes a large gold foiled bicycle.  Since I had already cut down that paper, however, I had to come up with an interesting way to include the piece back onto my page.  I trimmed the front half of the bicycle off, and aligned the remaining piece up just below my journaling.  Not only does the bicycle reinforce the theme, but it also creates movement through the page, and well, it's just so darn cute!
 

Sunday, October 18, 2015

#Funtimes: A Just Nick DT Page

Happy Sunday!  Did you happen to catch a peek of the 'Going in Circles' cut file that was featured on the Just Nick blog all week long? Isn't it fun?!  Not only is this new design awesome, but it's also the FREE download for October.  Yep, you read that right it's FREE until October 31st at midnight. Just add the Going In Circles Background to your cart and use the code: CIRCLESFREE at checkout and it's all yours!
 
I couldn't wait to use this design, accompanied by a favorite photo of my daughter from over the summer.  One quick look at the page and you can easily see why this design coordinated so perfectly with the snap of my little girl in a polka dotted inner tube - circles, circles and more circles!


Supplies used: Just Nick Going in Circles background and Hashtags 1 cut files; Pink Paislee patterned paper and diecuts; Simple Stories chipboard pieces and diecuts; October Afternoon buttons; We R Memory Keepers sequins; Kerri Bradford stamps; Stampin Up ink; Bazzill Cardstock; Other: foam adhesive, Silhouette, vellum.
I sized the file down, and cut it out of the same white cardstock that I used for the base of my page. Those open circles were just begging to be filled with snippets of fun and colorful papers, don't you think?!  A few strategically placed sequins and embellishments find a nice home among the circles, too!


If you haven't already noticed, I am constantly reaching for my stash of Kerri Bradford studio stamps.  In my opinion, you can never have enough text throughout a page.  A bright teal ink combined with these versatile sentiments, really jazz up those arrow diecuts.

 
I knew I'd need a bold font for my title, to prevent it from being overshadowed by the circle design on the top half of my page.  I turned to the Hashtags 1 cut file, knowing that the strong type and fun sentiments would be a great match.  I selected '#funtimes' - cutting it once from the same textured white cardstock and again from a subtle blue grid patterned paper. Using the blue diecut title as a shadow, creates interest and separation from the white background, while still maintaining cohesion. 
 
 
Check out the all the posts on the Just Nick blog this past week, to see how the design team used this freebie file, and grab your own.  But hurry because the file is only free until October 31st at midnight!

Friday, September 11, 2015

First Day Photos: A Just Nick DT Page

Good morning and happy Friday!  All week long on the Just Nick blog the design team has been sharing projects inspired by everything 'Back to School'.  Nicole's awesome cut files and the push to create something to fit the school theme, prompted me to pull out these photos from Emme's very first day of preschool, last year.


Supplies used: DCWV - cardstock; Simple Stories - patterned paper, die cuts, bradz, stickers; October Afternoon - flair, diecuts, patterened paper; Pebbles - patternend paper; Tim Holtz - mini attacher and staples; Other: foam adhesive, glue dots, Veteran Typewriter font.
I had a lot of pictures to include, so I knew I wouldn't have much leftover room for a large background file or intricate, detailed design.  Lucky for me, Nicole has files are versatile to fit just about any theme or projects parameters.  Admittedly, her word files are some of my favorites and what I naturally defaulted to for this page.  I used the word 'photos' from the Hashtags 1 file, to fill in the white space on my focal point photo, and complete my title.
 
 
I love that the font used for all of the text in this cut file, leaves out the spaces for the insides of the letters.  I used that as an opportunity to add some embellishment to the title, by pulling some coordinating heart diecuts and stapling into the center of each 'O'.
 
 
Adding the little bits and details at the completion of the page, is one of my favorite parts of the scrapbooking process.  I combined stickers from both Simple Stories and October afternoon to adorn my journaling card and finished off the cluster of elements with the cutest little piece of flair.
 
 
Thanks for stopping by!  I hope you'll check out the rest of the DT School project on the Just Nick blog this week!
 

Saturday, August 22, 2015

Captured...Summer Fun: A Just Nick DT Page

My kid's have officially completed their first week of school, as of yesterday afternoon. That means we are on to new routines and schedules, and summer days are quickly dwindling.  That also means, however, that I have lots of summer memories to scrapbook and reflect on.  This page celebrates one of our favorite family summer traditions: blueberry picking.


.
Supplies used: Crate Paper - patterned paper, diecuts, foam glitter words; Simple Stories - patterned paper; Pebbles - clothers pin; Bazzill Basics - vellum; Other - machine stitching, foam adhesive, seam binding ribbon; computer font - Veteran Typewriter
I am really loving the Poolside collection from Crate Paper.  It has so many versatile elements that can be used to scrap any type of summer memories - not just those associated with being in and by the water.  I layered several of the diecut pieces from this collection, for this pretty cluster to the right of my journaling and photo.  I love the pops of color and texture all of the layers add.

 
I used one of my favorite background Just Nick cut files - Circle 1 Background.  I opted to use the background design a bit untraditionally.  Rather than using it to fill the background of my page completely, I sized it down to around 8"x5".  At this size, the circle background acts more as a photo mat, making a home for both my photo and journaling block and a bit of extra embellishing.

When I first laid the circle background directly onto my striped patterned paper, it was hardly visible and completely overshadowed by the paper's color and design.  To make the cut file stand out and become more of a focal point, I backed it with an oversized matting of vellum and used foam adhesive to attach the diecut piece to my page.  Doing so, creates an extra layer of dimension and interest, and keeps the cool circle design from blending into the striped paper background.

 
Well, now I'm of to squeeze in a few more summer memories with my family, now that the weekend is here.  Happy Saturday and happy crafting!!!
 

Tuesday, August 18, 2015

YAY!...School starts today: A Just Nick DT Page

In my part of the world right now, everywhere you go is filled with signs of back to school.  All of the store shelves are stocked with supplies, alarms are set for earlier mornings and the kid's are all heading off with shiny new clothes and backpacks, to the start of new school year adventures. 

Today I'm sharing this page on the Just Nick blog, that is completely inspired by my current surroundings.  In fact, it proved to be just the push I needed to work on some first day of school pictures from the 2014-15 school year.


Supplies used: Doodlebug Designs - patterned paper, sequins, sprinkle shapes; DCWV - patterned paper (ledger); Basic Grey - patterned paper, letter stickers; Tim Holtz - mini paper clip; Bazzill - cardstock; Stampin Up - foam adhesive; Other - machine stitching, computer font.
Can you spot which Just Nick cut files I used on my back to school page?  I combined the Word Bubbles and Card Sentiments 1 files  to create my title.  Combining the two files was easy.  I sized the word bubble to fit within the spot I wanted it to sit, on my page and then layered the "YAY!" portion of the card sentiments file overtop of it. 

To give the word a little more 'pop', I backed the cut file with some red cardstock and used tiny letter stickers to complete my subtitle.


I couldn't stop myself at using only one word bubble - there are, in fact, several designs and styles included within the file.  Some sized down versions of the round bubble made the perfect home for a grouping of embellishments and even for some added text.


I even enlarged one of the rectangular bubbles to just over 6" long - making it an ideal spot for my journaling.

 
Did you know that every month, Just Nick releases a set of cut files that you can pick up for FREE?!  You're in luck, because the Word Bubbles file I've used above is the free file this month!  Hop on over to the Just Nick blog to see how you can add this digital die cut to your library for FREE.  And make it quick, because it's only available at no charge until August 31st.
 

Monday, August 17, 2015

Pool: A Just Nick DT Page

It's been a busy summer here at the Rench household.  Unfortunately, that has kept my sharing here on the blog to a minimum, but that also means that I have some catching up to do and lots of projects to share with you in the coming days.

Today I'm excited to share a page I had featured on the Just Nick blog, for summer week.

Summer for me and my kiddos means countless hours at the local community pool, so it was an obvious choice for me to scrap some of those memories.  I've been eyeing the Marquee Alpha
for awhile.  It was just the pop I needed to draw some serious attention to my title, amongst a page with lots of photos and lots of journaling. 


Supplies used: Just Nick "Marquee Alpha' cut file; Crate Paper - patterned paper, diecuts, puffy stickers, chipboard frames; American Crafts - twine; Scrapbook Adhesives - foam adhesive; Tombow - adhesive; Other - computer font (Veteran Typewriter), machine stitching.
Isn't the detail in this font amazing?  Even when it's sized down to just an inch and a quarter high, as I've done for my page title, it still makes a strong impact on the page.


To add even more dimension to these fun title letters I cut one set of each letter from my pattern paper and three additional sets of the title letters from kraft cardstock.  Adhering each of the three kraft layers on top of one another and finishing off each letter with the patterned paper version creates lots of dimension.  In fact, the letters almost feel and look as if they are chipboard, which in this case, coordinated perfectly with the other chipboard elements on the page.


Without a doubt, one of my favorite pieces of every Crate Paper collection are the chipboard frames.  I used several in my collage of photos to make some of my favorite pictures stand out.  This wood grain chipboard frame, fit perfectly around the picture of my girl enjoying her first root beer float.  Accenting it with the darling little popsicle diecut, was a no brainer!


This particular frame makes a big impact when attached to the page with foam adhesive.  It highlights a fun photo of my boy and his buddy and makes it stand out from the collage of pictures and diecuts surrounding it.

 
That's it from me today!  I'll be back often this week with lots more to share.
 

Saturday, April 18, 2015

4 July: A Scrapbook Page

Happy Saturday, crafty friends!  I hope you are enjoying your weekend.  Our weekend is jam packed with - baseball games, birthday parties, baseball practices, friends over to play, church, more baseball practices, and dinner with family.  Whew!  Fortunately, I have a couple of hours in between activities, so I thought I'd pop on here and share a page I finished up the other night.

I've been eyeing the Simple Stories Life Documented collection for some time.  And lucky for me, I finally got my hands on some from the Paper Issues store.  I didn't have any pictures in particular, in mind for scrapping with it, so I was pleased to discover just how well it would work with photos I had from the Fourth of July.


Supplies used: Simple Stories - patterned paper, diecut piece; Pink Paislee - patterned paper (ledger); Kerri Bradford - Line by Line & Travelogue stamps, cut file (July); DCWV - cardstock; Studio Calico - wood veneer stars; Stampin Up - ink; Other: foam adhesive, machine stitching, computer font.
Using that navy and white stripe as my background piece was a no brainer!  In addition, the grey polka dot pattern helps to tie in more colors from the photos, while the neutral wood grain and lined papers create a resting place for the eye and help to balance out the design.

The title was created with a free Kerri Bradford cut file and a diecut from the Life Documented bits & pieces pack.  The red bow was a last minute addition and I love the pop of color it gives to the page and the attention it draws to the title.


What first drew me to this collection were all the bits and labels included in the diecut pack.  I knew I would have lots of fun stamping and embellishing all those little labels to customize my page.  I used some brand new stamps from Kerri Bradford to dress up the labels and a couple of Stampin' Up inks to customize them to my page even further!
 

The labels look so fun all layered and stitched together.  Stacking and layering them helps create movement throughout the page and besides that, they're just plain FUN!

 
Thanks for visiting me today!  I hope you're enjoying your weekend and spending some time getting crafty!


Thursday, April 16, 2015

My 2 Boys: A Scrapbook Page & FREE cut file

I was thrilled to receive an email awhile back from the one and only Nicole Nowosad.  If you love scrapbooking, you probably already know who Nicole is.  She is a rock star designer and can do magic with patterned paper and her silhouette machine! Nicole designs a monthly FREE cut file for Scrapbook and Cards Today magazine (among various other crafty accolades!). She always designs an amazing layout, showing the cut file in action on the SCT blog and this month she asked me to share my take on designing with that cut file too.  Here's a look at the file she designed...
 
April 2015 freebie image
Isn't it great?  There are so many different ways and mediums with which this design could be used.  Here is the page that I designed...

Supplies used: Cardstock, thickers & cork hearts - American Crafts; Patterned Paper - Simple Stories, Pebbles; Wood veneers - Studio Calico; Stamps - Ali Edwards; Ink - Stampin' Up, Hero Arts; Epoxy embellishments - Jillibean Soup; Transparent die cut - Basic Grey; Tools - Silhouette, sewing machine.
I loved the punched circle cut file so much that I super sized it to make up the background of my scrapbook page.  I had fun filling in all of the circles with photos, journaling, patterned paper, stamping and lots of decorative elements to document my story.  

A pint sized version of the file was a fun way to fill in a few of the background circles too.  Cutting the smaller version of the file from white cardstock and laying it over top of a white background creates more of a textural effect.  I also made sure to arrange the circle backed circles into a visual triangle to help guide and direct the flow of the page. 

 
I reserved one of the large circles to hold both my title and journaling.  I had fun mixing and matching some Ali Edwards stamps to create the perfect title, that begins to tell my journaled story.
 

If you want to see the gorgeous page that Nicole designed using this cut file and download a copy for yourself.  Head on over to this post on the Scrapbook and Cards Today blog.

Happy Crafting!

Wednesday, April 15, 2015

Meeting Charlie: A Scrapbook Page

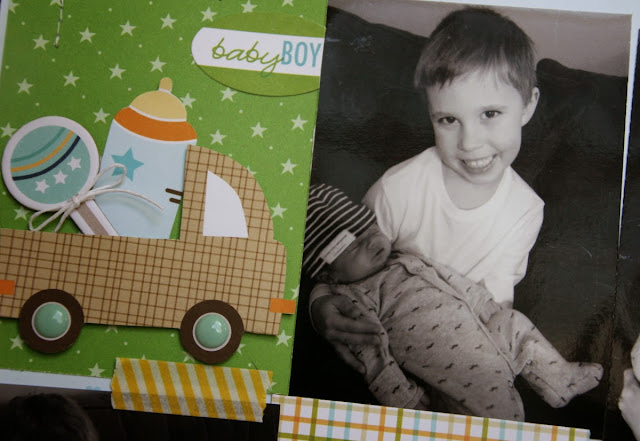
I showed a small peek of the page I'm sharing today on my instagram account awhile back.  I just couldn't resist sharing how I tucked a few sweet little elements into the back of the Bella pickup truck as my page came together.  Kinda fun, huh?  It was actually sort of a happy little accident.  I knew I wanted to include the baby gear but couldn't find a place for it where it wasn't floating on the page.  The truck bed ended up being the perfect solution!


I don't know what took me so long but I'm finally sharing the page in it's entirety, with you today!

Do you recognize this paper collection?  It's an oldie but goodie from Bella Blvd that I've used quite a bit, but still love and hoard!  I wanted to use many of the patterns included in this line, so cutting my patterned papers and sizing my photos to 3x4 allowed me to do so, while still fitting in four photos on this one page layout.


Supplies used: Bella Blvd - Patterned paper, stickers, chipboard shapes, washi tape, letter stickers; Doodlebug - enamel dots; Simple Stories - label stickers; Other: machine stitching, foam adhesive.
Here's another look at this cute little cluster of elements.  The truck and bottle were cut from patterned paper and the rattle is a coordinating chipboard sticker.  I added a little extra dimension to the truck's wheels with a couple of strategically place enamel dots.
 

I'm quite addicted to labels of every shape and size, as of late.  I love to use them to print bits of journaling, record the date or even stamp on.  This yellow one from the Staples Martha Stewart collection was the perfect size and length to include my subtitle.

Another label, this one from Simple Stories , provides a spot for some additional journaling.  I LOVE those large letter stickers from Bella Blvd.  Seriously, that font is just the cutest - I need it in every color!

 
Thanks for joining me today!  Happy crafting!
 

Sunday, March 29, 2015

Story: A Scrapbook Page

Happy Sunday friends! It's not often that I get a chance to sneak in some scrap time during a weekend day.  We are often so busy with kid activities and/or enjoying family time - today was an exception, though!  The boys were all off at baseball practice for a couple of hours this afternoon and the 'star' of the following page was taking a nap.  So, I brewed myself a cup of coffee and bolted to my craft space to finish up a page I started working on last night.


Supplies used: Crate Paper/Maggie Holmes - 'Confetti' patterned paper, ephemera die cut pieces, "Confetti' hardware; DCWV - Adhesive Fabric paper and cardstock;  Jillibean Soup - patterned paper; Simple Stories - patterned paper; Kerri Bradford Studio - 'Line by Line' stamps; Hero Arts - black dye ink; Becky Higgins - date stamp; Other: string, machine stitching, glue dots, computer font.

Some of the pieces/patterns from this project might look a bit familiar! A few days back I shared this page featuring lots of new Crate Paper and Maggie Holmes goodies that I scored from the Paper Issues shop.  I had so much fun creating with them that I had to dive back in to many of those same supplies for another page. 

I love the collage and flea market style to many of the Maggie Holmes and Crate collections!  They lend themselves to lots of mixing, matching and layering.  Combining that shabby style with bits of gold and sparkle is the perfect formula for an ultra feminine page.  My sweet girl dressed in her tutu and ready for her first dance class - couldn't get much more girly or feminine!


Can you tell I had fun with layers and stitching?!  I just couldn't stop adding little bits and pieces.


The pictures don't translate well, but the page background is full of gorgeous, subtle texture.  I used a piece of DCWV adhesive fabric layered over top of white cardstock.  I used my sewing machine to stitch horizontal lines every 2", or so, down the page. The stitching adds some additional texture and combined with the fabric, really supports the shabby, flea market vibe.


Thanks for joining me today!  Hope you're squeezing in some time this weekend to do something that makes you happy, too!