Gams

Showing posts with label Stamping. Show all posts

Friday, June 26, 2015

Swim Everyday: A SCT Published Page

Happy Friday!  It's looking like a mostly gloomy and rainy weekend here, but that won't stop me from sharing a bright and summery page today.  I was fortunate to have this page published in the Reader's Gallery of the summer issue of Scrapbook and Cards Today magazine
 
Supplies used: Pink Paislee - patterned paper; Die Cuts With a View - Cardstock; MAMBI - transparent arrow diecut; Kerri Bradford - stamps; Project Life - date stamp; Hero Arts - ink; Stampendous - embossing powder; Heidi Swapp - acrylic letters; Simple Stories- label sticker; Doodlebug Designs - sequins, enamel dots; Studio Calico - flair; Other: crochet thread, silhouette, foam adhesive, machine stitching, computer journaling.
 
The idea for this page, originated from this sunburst design you see on page one of the two page spread.  I loved all the gorgeous, summery prints in the Pink Paislee Hello Sunshine patterned paper pack.  The sunburst allowed me to include several designs on the page.  I trimmed various lengths and widths of the papers and arranged them to mimic sun rays.  Placing my photos at the rays intersection point, draws attention to them and keeps the pictures the focus of the page. 


I had several more photos from our lazy summer pool days, that couldn't be left out.  A collage of images was the obvious solution.  I used larger pieces of the same patterns and papers from the first page to tie the two together.  Layering the papers created a fun and organized backdrop for my photo heavy page.


I scattered bits of sequins, flair and enamel dots throughout the two page design.


The ledger style paper was the perfect neutral canvas for my lengthy journaling.  I turned my journaling on the vertical, to squeeze it into the design and not take any space away from my photo collage.

 
The weather themed tags were made from the chalkboard print paper in the Hello Sunshine paper pack, and Kerri Bradford's amazing stamps!  I just love how they fit in with the theme of the page, and they couldn't be cuter stamped and embossed in white!

 
The title is made up of a variety of mediums - transparent and diecut letters and a script silhouette cut. 

 
Want a closer look at this page and lots of other inspiring artwork?  You can download your own FREE copy of the summer SC&T issue right here or better yet, subscribe and receive your very own paper copy in the mail every quarter!  It is such a beautiful and well put together magazine and this issue in particular is full of inspiring projects and ideas.  I can assure you, you won't be disappointed!

Tuesday, January 20, 2015

Love These Three: A Scrapbook Page

Hello!  I'm back again today to share a page of my littles, I put together awhile back, but never got around to sharing here, for one reason or another.  As I mentioned in a recent post, I often like to dig into my older photos to spark my creativity.  These pictures are from three years ago!  Hard to believe my babies were this little!  In fact, looking back on them now, I'm thinking it would be fun to do an updated version of these photos, scrap them (of course!) and put the pages side by side in an album.

Now onto the page details...Aside from some stamping and bits of embellishment, this page is all Jillibean Soup.  I color blocked the background using a one-third, two-thirds approach.  Using the full sheets of patterned paper for the background works in this scenario because of the subtly of the patterns.  The photos still remain the focus and the embellishments carry your eye throughout the page.


Supplies used: Jillibean Soup - patterned paper, stickers, diecuts, buttons; Queen & Co - goosebumps; Stampin' Up - large flower punch, inks; Technique Tuesday - Studio AE stamps; Other - ribbon, adhesive pearls and gems, veteran typewriter font, circle punch.
I built a sweet and custom stamped embellishment piece to accent the ribbon that covers the seam of the patterned papers on my page.  I love that stamping allowed me to completely customize this little cluster, in color and theme!


The floral elements appear to be 'spilling' down the left side of the page. This grouping of flowers was built with a combination of patterns, punches, stamps and various embellishments.  I love the eclectic and almost vintage feel to these flowers, that is achieved by mixing all of these elements. 


Another bit of stamping in the lower right corner, ties my journaling back to the rest of the page, making for a more seamless, cohesive design.

 
That's it for today, friends!  Hope your finding time to get crafty this week!
 

Monday, January 19, 2015

Shaker cards

Hi crafty friends!  Sorry for my unannounced absence!  I didn't intend to stay away from the blog for quite so long.  But with the holidays and new year's resolutions (recommitting to exercise!) thrown into the mix, I've had to prioritize a bit.  I'm sure you can relate!  The good news is, while I was away, I've also been busy crafting so I'll be around this week with lots to share!

Today I'm bringing you a couple of cards I created.  If you haven't noticed, shaker cards are making a bit of a comeback in the crafting world.  I was in need of cards for a few special people, so I decided to throw my hat into the mix and create my own version of the latest card trend.

For this first one, I resurrected some Imaginisce stamps from long ago.  Despite their 'age', they make for a sweet sympathy card for a friend who recently lost her dog.  I stamped the dog on white cardstock and colored her in using colored pencils and blending with gamsol, to match the coloring on my friend's beloved pooch.  I stamped and cut out two clouds to fit within the shaker window.  To give the background of my card some subtle interest, as to not take away too much attention from the showpiece shaker, I used an ink blending technique.  I stamped the cloud onto the sticky part of a post-it note and cut it out to create a mask for which to blend my ink over top.


Supplies used: Imaginisce - stamps (cloud and dog); Hero Arts - sentiment stamp, black ink; Diecuts With a View - cardstock and glitter paper; Simon Says Stamp - heart dies; My Favorite Things - oval die; Tim Holtz - distress inks; Scor-tape - adhesive; Fiskars - scissors; Other: colored pencils, foam adhesive, scrap sheet protector, glass beads.
I used an oval shaped die from My Favorite Things to create the window for my shaker card. Some ink blending behind the window, creates a nice sky look at the back of the shaker. Did you know you don't have to use any special material for the transparent part of your shaker?  For this card and the next, I cut up an old damaged page protector to fit in the window.  Talk about trash to treasure, huh?!  My shaker is filled with clear glass beads and sweet little hearts diecut from DCWV cardstock and glitter paper.  This DCWV glitter paper is my go to for manual diecutting.  It cuts wonderfully and leaves behind no mess!  I used a red sheet from the Holiday Glitzy Glitter Stack to cut my hearts.


On this next card, I thought it would be fun to create the shaker in the 'paper' part of the typewriter stamp.  It's kind of fun and unexpected touch, isn't it? Aside from a sprinkling of diecut hearts I kept the background pretty simple.  Because of that, I felt it was missing a little 'something', so I grabbed a small strip of glittery patterned paper from DCWV's Candy Cane Lane Stack to accent the right edge of the card.


Supplies used: Simply Iconic - stamps (typewriter and sentiment); Hero Arts - black ink; Diecuts With a View - cardstock, patterned paper and glitter paper; Simon Says Stamp - heart dies; Tim Holtz - distress ink; Scor-tape - adhesive; Fiskars - scissors; Other: foam adhesive, scrap sheet protector, glass beads.
More glass beads and tiny diecut hearts fill up the shaker.  This time I stamped the sentiment on the card base, so that it would end up in the background, inside the shaker box, for another interesting spin.

 
Thanks so much for joining me today as I dabbled in the shaker card world!  Hope you'll come back and visit me soon.
 

Sunday, November 30, 2014

Catching up with Love My Tapes

Happy Sunday friends!  I hope you all enjoyed a nice weekend, and for my American friends, I hope your Thanksgiving was filled with family, good food and abundant blessings.

I wanted to pop on real quick tonight to share a couple of projects I had up on the Love My Tapes blog recently.  The first one is a page to match the season.  While these pictures are technically from last winter, the recent snow we've had and my stack of cozy, swater-like fabric tapes had me itching to scrap this memory!


Supplies used: American Crafts - patterned paper, cardstock, heart punch; Jillibean Soup - background patterned paper, Love diecut word; EK Success - Martha Stewart snowflake punch; Doodlebug Design - sequins; Love My Tapes - blue fabric tape; Other - machine stitching, Veteran Typewriter computer font; Silhouette portrait.

Here's a closer look at the blue fabric tape.  It does a great job of drawing your eye to the title and framing it out on both ends.  The texture and pattern remind me of a warm, cozy sweater so that also made it a perfect match for this page!


To get more details on this page, hop on over to the this post on the LMT blog.

My next project was created with my Thanksgiving hostess in mind, but really you could send a card like this anytime of the year!  Switch up the colors and icon and it could work for just about any season.  Here's a look...


Supplies used: LMT- ivory lace tape; Bazzill - cardstock; Stampin Up - embossing folder; Doodlebug Designs - sequins; Hero Arts - ink, leaf stamp; Jillibean Soup - stamped sentiment; American Crafts - twine; Other: foam adhesive.

This particular project features LMT's pretty lace tape.  For more info and a closer look, check out this post on the LMT blog.

That's it for today!  Join me back here tomorrow and I have two cute pages to share.  See you then!

Saturday, February 15, 2014

Quick thank you card

Happy Saturday!  We've had a busy day of shoveling, playing in the snow and kid's sports.  Somehow, I still managed to sneak in a little time to play along with one of the challenges on the Jillibean blog, though (and hope to keep working on them, when my littles are tucked into bed for the night!  Soon, soon!).
 
I derived inspiration for the layout of this card from sketch #1 that was posted on the blog on Friday.  I dug into my latest Jillibean favorite, Cold Avocado Soup, to whip together this quick card for a special friend!


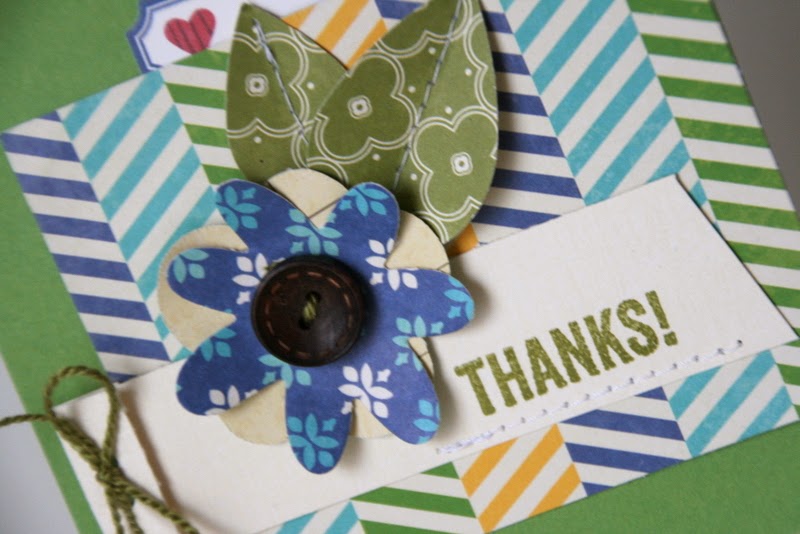
Supplies used: Jillibean Soup - patterned paper, button, label sticker, stamped sentiment; Doodlebug - flower dies, enamel dots; Studio Calico - sequin; Stampin Up - ink, splatter stamp; Fiskars - punch; American Crafts - cardstock.

That sweet stamped sentiment is a Jillibean stamp from the Cold Avocado line.  I love the type-set and it stamps great with my small stash of Stampin' Up inks.


In the sketch there was a place for splatters along the top of the card.  I used a Stampin' Up stamp and ink to achieve the same look.  So, yeah, those are fake splatters!  You'd never know unless I told you, huh?  I love that the stamp allows you to have 'controlled' misting!  That's just perfect for my OCD-self! Ha!

 
Thanks for visiting today!  Hope you're stealing away some crafty time this weekend, too.

Thursday, January 30, 2014

A layout about : #ME

I can't believe this is officially my first post of 2014!  December got away from me a bit due to a reoccurring case of pneumonia and a couple of days in the hospital over Christmas.  Unfortunately, the month of January has been almost just as much of a wash, as well.  I spent the first part of the month trying to take it easy and recover and the second half of the month has been filled with a billion and one snow days and school delays for my kiddos.  No worries though, I've still been scrapping, just not much time to share until now.

While away from blogging, I've mainly been trying to wrap up my 2013 December Daily album.  I only have two days left to document, so I'll be sharing that here soon.  I'm pretty happy with the way it turned out and even more excited to finally have a COMPLETED December Daily - woot, woot!

Today, however, I'm sharing a page that I made back in the fall.  It's just a page I did for fun to experiment with some artsy techniques - stamping, watercolors, misting, embossing, stencils and gelatos.  It documents a little of what I was thinking/hoping/liking at the time and a recent selfie.

Supplies used: Patterned paper - Fancy Pants - diecuts, felt flower, patterned paper (stripe); Echo Park - patterned paper (chalkboard); Jillibean Soup - stickers (script words); Studio Calico - frame stamp, wood veneers, sequins, Mister Huey gold mist; Heidi Swapp - acrylic letters, stencil; October Afternoon- buttons; American Crafts - embossing powder; Other - gelatos (silver & gold), Stampin Up inks for watercoloring; Century Gothic font.

In the upper left and lower right corner of the page, I used a dotted stencil and some gold shimmery mist to create some subtle added dimension and interest.  To draw a bit attention to this subtle accent, I highlight both areas with a few randomly placed sequins.

 
I tried out some gelatos on this pretty punched butterfly.  I started by stamping the butterfly with a text stamp in versamark ink then embossing it with a clear powder.  I then rubbed and blended gelatos over top of the image, using water to effectively move and blend the colors.  The punched piece make a nice little accent, topped with some of my very favorite October Afternoon buttons.

 
How cute is that slide style frame stamp?  It was an exclusive set for students enrolled in Studio Calico's Inked class.  I stamped and embossed it in black, and used various different inks and a water brush to color each one.  The 'frames' highlight the bits and pieces of my journaling throughout the page and I love how they look scattered down the center.


I'm hoping to be back to a more regular blogging schedule now.  So come back soon to see all that I have to share with you!

Sunday, September 8, 2013

Back to Preschool

It's hard to believe that this little buddy of mine will be heading off to four day preschool on Monday! 

 
That's a big jump from the two day class he attended last year.  But, he is my laid back, go-with-the-flow kinda kid, so I know the transition won't phase him too much.  And the fact that he's been watching his big brother head off to school each morning for weeks now, has him definitely excited to do the same!  Mommy, on the other hand, will just be forced to deal with it and keep busy with the other mischievous little sweetie running around here.  I'm sure she won't make that too hard!
 
With Justin's new school year on the horizon, I thought I'd better get to sharing the page I put together documenting his first day of school from the 2012-2013 school year.  I put this page together back in the springtime, after I snagged some of Doodlebug's colorful and office-themed line 'Take Note'.
 
;
Supplies used: Doodlebug Designs - patterned paper, Doodlepop sticker, buttons (star shaped), cardstock (yellow); Crate Paper - brad (blue fabric); KI Memories - stamps (smiley, 'through the lens', numbers), chipboard star; Stampin' Up - stamps ('first day of school', alphabet), ink (yellow); American Crafts - cardstock (kraft background), date stamp; Pebbles - ribbon; My Mind's Eye - enamel dots; Queen & Co - washi tape; Simple Stories - label stickers; Heidi Swapp - journaling spot; Veteran Typewriter font; Memories - black ink;  Other: binder clip, crochet thread.

What's a page about school without some actual school-type supplies?!  I've had this little blue binder clip in my stash for years and knew it would be the perfect accent for this page.  Speaking of 'older supplies', do you recognize anything else in this picture that may have been sitting in my stash for a bit of time?  I, in fact, spy two things - the chipboard star is from an old KI Memories school collection, and the little 'today' paper is a journaling pad from a Heidi Swapp collection I picked up many moons ago!  Anybody remember either of those?  Sometimes it's fun to mix the new with the old!


I have been adding these Simple Stories SNAP labels to just about everything that crosses my scrap desk lately.  They are just the perfect size and colors to fit in just about anywhere.  And as you can see here, I'm having fun stamping on them, as well!

 
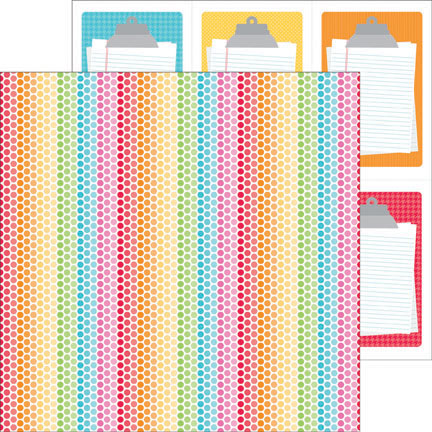
My very favorite piece of patterned paper from the Doodlebug Take Note collection was definitely the 'Ditto Dots' double sided paper, as seen here:
 

Image coming soon!


I immediately feel in love with those sweet little clipboards and knew that they would make a great spot for journaling and possibly even help to add an interactive element to my page.

 
I was right!  I simply selected and trimmed out one of the clipboards to use as my base, then trimmed around only the clasp and paper of a second clipboard to layer over top of the first.  Once attached, just at the top, it allows the 'paper' on the clipboard to flip up, just as it would on a real clipboard, and reveal additional journaling.  Kind of fun, huh?!

 
Thanks for stopping by today!  If I can get through Monday with another of my littles off to school, I'll be back with some more crafty things to share!  Wish me luck (and not too many tears!).
 

Saturday, December 22, 2012

More card shares...


Just hopping on here for a quick post tonight.  As with most, I'm in still in the midst of holiday prep.  I just tucked my little ones in for the night, now I'm retiring to the basement to covertly wrap gifts and watch Love Actually!  Doesn't sound so bad, does it? ;)  However, before I get knee deep in wrapping paper, tape and tissue, I wanted to share a few more cards I've made recently.

It seems there are a number of my friends/family that are having/had new babies recently.  In order to be somewhat prepared ahead of time, I sat down to craft a few sweet greetings to welcome those precious new babes.  The cards are pretty self explanatory (I think!) and use up quite a bit of older product (does anyone recognize that OLD, OLD Making Memories paper???!?), so I won't list out all of the supplies, as I normally do.  If you have any questions about something I used though, please feel free to let me know in the comments.

Well, I said I was going to make this short and sweet, so here are the cards...

 
How cute are those little footprints?  That, along with the sentiment is a clear stamp from We R Memory Keepers.  You could easily change up the patterned paper and colors on this card to make it work for a boy.  The sentiment was stamped on vellum to make it stand out just a bit.

 
Again, switch up the color palette on this one pretty simply, to make it work for a girl. 

 
This last card features the same sentiment stamp from before, but since I was in the mood for a little coloring, I pulled out a sweet baby themed set from Lawn Fawn.


That's it for tonight - my movie is calling!  Hope you all are enjoying this last few magical days before Christmas!  I'm hoping mine will be a little more magical and less stressful once I can cross the task of wrapping off my list!