Gams

Monday, August 29, 2011

Monster Mania

Did you happen to notice that goofy, but oh so cute, little blue monster that has now made his home over in my blog sidebar?!  He happens to be one of the new little icons featured in Doodlebug Designs newest Halloween line called 'Monster Mania'!  He and the rest of his little monster friends that join him in this new collection have won my heart.  But, if you know me well, that's no surprise -- Doodlebug has been one of my very favorite scrapbook companies and (thankfully!) has been around since I first started scrapbooking many, many years ago. 

Well, the reason I'm bringing this little guy to your attention is not only because I think he's a nice little addition to the blog (hey, he is even color coordinated with the current background - Ha!), but also because I just happened upon this line at my local Archivers store.  I had both of my little guys with me, so my shopping time was limited, but I did manage to grab him and a few of the coordinating pieces!  And what would you guess I was planning to do with these new supplies, with Halloween still a couple of months away?  Well, I thought I might just get a jump start on the upcoming holiday and make up a cute little home decor piece that features these items.  I would LOVE to share my little creation with you, as I am thrilled with how it turned out, however I just submitted it along with a few other projects to be considered for their current design team call.  I will give you a little sneak peek, though. 


And I promise to come back to the blog, when I can give you the full reveal, and even post a little tutorial on how I put this piece together.  Sound fun?  In the meantime, I'll share a fun little page I put together, using Doodlebug's Halloween line from last year, with pictures of my boys from Halloween 2009:


Gosh, I still can't get over how little they look in those pictures!?!  Here's some little treats that I put together for some neighbors (Hi, Jen!) and TJ's teachers, as well:


Are you officially ready to locate some Doodlebug for your own stash, now?  That's a whole lotta cuteness, huh?

Thanks for stopping by!  I'll be back soon, with those school pages I promised last week!


Thursday, August 25, 2011

What a week...

It's been quite a busy week here at the Rench household, with the official start of the school year:


And celebrating a big birthday - hey, he now officially needs two hands to show his age:


Somehow, despite all the major milestones, this mama has managed to hold it together (mostly!).  I'm not going to deny that there hasn't been some tears (thank goodness for sunglasses!), but I've done better than I expected!  However, just when I thought I was doing great, I witness a moment like this one, and the tears start flowing again:


Little brother, Justin, was nearly as upset as his mama when we dropped TJ off for his first day.  He had to run back for one last hug, that, as you can see, was happily accepted from his older brother.

Despite all the newness that this week has brought, I managed to squeak out a layout for a design team assignment.  I picked up some pieces from Echo Park's Happy Days collection from Simply Scrapbooks and unearthed some photos from my Dad's surprise 60th birthday bash, that I thought fit the theme and color scheme of theses papers just right.


A closer look at page one:


and page two:


I had so much fun creating that funky border that surrounds the two pages.  It was a great way to use many of the papers I love from this line and tie in more of the colors from the bottle cap paper.  I already have another page in mind to work on with these papers, now I just need to find the time to do it!

Thanks for stopping by!

Wednesday, August 24, 2011

Echo Park

In my last post, I mentioned that Echo Park Paper Co. has quickly become my favorite new scrapbook brand.  In fact, you can tell just by flipping through my scrapbooks that most of my recent pages are ALL Echo Park!  So, I was thrilled when I found out a few months ago, that they were searching for new 'Fresh Face' designers for their brand, and eager, of course, to throw my own name into the running! 

Admittedly, the hardest part of the whole 'Fresh Face' submission process was narrowing down my favorite Echo Park Pages to feature on my blog today!  But the first I'm going to share, certainly tops the list.  I used the Country Drive collection on this page.  I couldn't resist it's bright fun colors and patterns!  I recently came across this hilarious strip of photobooth photos and needed just the right paper to compliment this happy memory.  I am always a sucker for photobooths, and jumped at the chance to squeeze my new little family into one on our very first vacation!


(Supplies: all from the Country Drive Collection: Apron Strings, Border Strip and Little Ladies patterned papers and  Elements Stickers, foam adhesive, buttons, Doodlebug letter stickers, Making Memories chipboard hearts and decorative stick pin, machine stitching)

To create this page, I started with a kraft background and cut four 1/2" strips of the 'apron strings' patterned paper to create a border for framing the remainder of the page.  Next, I adhered and sewed through the center of each strip, continuing all the way around the page.  I adhered my photo strip to the right, center of the page and typed my journaling on a scrap of kraft cardstock, which I adhered to the left and bottom third of the photo strip.  I measured and cut a piece of the 'little ladies' paper to fill in the space above my journaling.  Before adhering this rectangle of patterned paper, I distressed the edges with my scissors and sewed around the border.  I used some glittery letter stickers for my title and to fill in the space below my journaling block.  Then, of course, it was time for the fun part - embellishing!  I covered a large and small chipboard heart in 'border strip' and 'apron strings' and pulled just about all of the hearts from the sticker sheet for added fun.  Some of the hearts were popped up with foam adhesive and others were stuck directly to the page.  Finally, I used some additional stickers from the 'elements' sticker sheet to dress up the rectangle of patterned paper and top and bottom page borders.  Here are a couple close up shots of some of the page details:


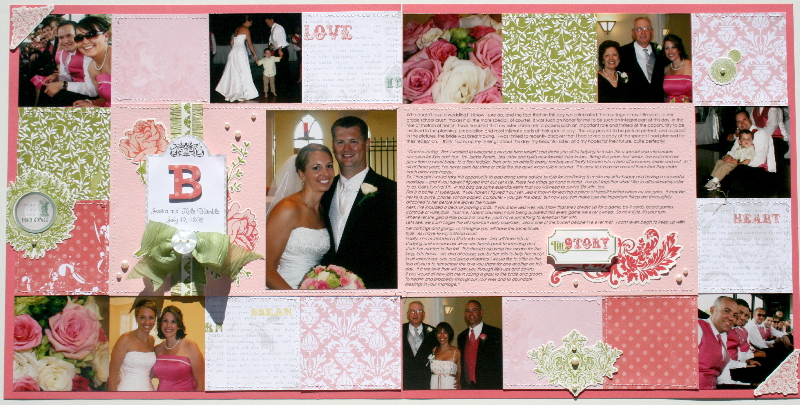
The second page I'm sharing, includes some pictures I waited a long time to scrapbook.  Maybe I was waiting for just the right paper to use for these pictures or it could just be that scrapbooking wedding pictures quite honestly scares me a bit!  Regardless, I'm glad I waited because Echo Park's Victoria Gardens proved to be just the right style and color scheme to fit my little sister's wedding photos.


(Supplies:  all from Victoria Garden collection: Garden Gate, Cheerful Words, Rose and Journaling Cards patterned papers and Elements stickers, chipboard letter 'B', Making Memories ribbon, Doodlebug button, Queen and Co, adhesive pearls, foam adhesive, machine stitching)

A close up of page one:


and of page two:


To create these pages, I started off with a medium pink cardstock background that would ultimately serve as a border, to frame out the whole two page spread.  There were just so many of the papers in this collection that I LOVED, I wanted to find a way to incorporate as many of them onto the page as I could.  So, I trimmed 2 7/8" squares of the A and B sides of: 'garden gate', 'cheerful words', 'rose' and 'journaling cards' papers and interspersed them along the entire 12 x 24 page border, randomly alternating them with my photos.  I stitched along the edge of each of the patterned paper squares for some added interest (and because I just can't resist adding some machine stiching!) before permanently adhering them to the page.  Next, I cut a light pink cardstock to fill in the middle of the bordering grid on both pages.  On page one, I used the light pink cardstock to highlight my focal point photo and page title.  For the title, I layered many of the floral stickers from the 'elements' sticker sheet and used foam adhesive to adhere one of the journaling cards over top.  Before adhering the journaling card, I ran it through my printer to add my sister and her new husband's names and wedding date, along with a chipboard letter that I covered in some of the leftover patterned paper.  I used ribbon, a button, adhesive pearls and a border sticker from the the elements sticker sheet to finish off the title block.  I knew I had a lot of journaling I wanted to add to the second page, since I had saved my matron of honor speech from that day.  The center block served as the perfect spot for my lengthy journaling and a few additional elements stickers and adhesive pearls.  I finished off the two pages by adding some additional stickers to a few of the patterned paper squares, embellishing them with adhesive pearls, and adding sticker 'photo corner's to the top left of the first page and bottom right of the second page.  A few additional close-ups of the details:


The final project I'm sharing today, uses my most favorite Echo Park line, to date: Little BoyWith two little guys of my own, I'm always on the hunt for boy themed papers and embellishments.  In my opinion, none have quite captured the essence of my guys quite like Echo Park did in this fun line -- they simply knocked it out of the park!  In fact, this is one of the many pages I have made, using this collection.


(Supplies: all from the Little Boy collection: Awesome Dots, Cool Stripe, In the Clouds, Little Boy Borders and Journaling Cards patterned papers, Doodlebug buttons, Tim Holz mini paper clips, 7 gypsies photo turn, jumbo brad, machine stiching)

To create this page, I started with one of the coordinating solids of the Little Boy line, to create the base of my page.  Next I cut a 10" square piece of cream colored cardstock and centered it on the background.  Then I layered varying widths of: 'awesome dots', 'cool stripe', 'in the clouds' and 'little boy borders' on top of the cream base, leaving an 1/8' border around the perimeter.  I then, sewed along the horizontal edge of some of the paper strips.  Next, I placed my photo and journaling block, which I had pre-printed on the ledger looking side of 'little boy borders', toward the bottom half of the page.  Then, I went to town cutting up many of the journaling cards for additional text and to tuck in and embellish various parts of the page.  I finished off the look with some 3D details including: buttons, mini paperclips, an arrow photo turn and clear star.

I think it's easy to see why Echo Park has won my heart!  Their beautiful collections have inspired me to capture some wonderful memories and perfectly showcase some of my favorite photos.  I know I will be reaching for this brand over and over again!

Saturday, August 20, 2011

Farewell Summer

In my last post, I promised some school themed layouts, but with only a few short days until the school year officially starts here, I'm feeling a little reminiscent of the summertime.  So instead, I thought I would share with you a happy little 2 pager using Echo Park's 'Splash' collection and some photos of the boys from last summer, enjoying their favorite summertime activity: swimming! 

Who doesn't like to cool off in the pool, when the temperatures are soaring?!  I had so many pictures from all of our summer swimming adventures that I decided to combine them on one two page spread for a 'summer review' style layout.  Here's a look at both pages, side by side:


A closer version of the left page:


the right:


and some of the details:


Echo Park is quickly becoming my favorite scrapbook company.  I have found myself drawn to nearly all of their collections and find myself reaching for them over and over again.  The 'Splash' line was no exception and I love that it's bright, but not too bright, color scheme works so well with water photos.  I know I'll be using up every bit of the 'leftovers' I have from this collection. 

Thanks, as always, for stopping by!

Friday, August 19, 2011

Christmas in August?!

So, I took a wee little break from the ol' bloggie.  No, I wasn't off powering through and completing my Christmas gift list, as the title to this post may imply.  One day, I WILL proudly add the task of completing my Christmas shopping and wrapping months in advance, to my own personal resume, though!  However, I was working on some scrapbook pages, continuing the planning and prep for our big guy's birthday bash, and might have taken a little trip with the hubs to Chicago (more details and pictures to come in another post!)!  Add all that fun stuff to: filling out loads of paperwork for the upcoming school year, ordering school uniforms, shopping for school supplies, and squaring away all of the allergy forms I have to fill out for our big guy, and that adds up to ZERO time for the blog.  I know, I know, you don't want to hear the excuses, you come here for the pages and the pictures...so let's get on with it! ;)

I am certainly not one to scrapbook chronologically.  For me, scrapbooking is as much as about the creative process as it is the memory keeping.  So, that often means that my current projects are inspired by an idea, a picture or in many cases ... some new supplies.  And some fun, inspiring, new scrapbook supplies are just what started my creative wheels moving towards creating these most recent pages.  Add that to the fact that I had spotted the latest My Mind's Eye sketch challenge on their blog, and thought I'd give it a try and play along.  Here is the sketch:

MME_LayoutSketch_2011_08

And here is what I did with it:


I spotted MME's new '12 days of Christmas' line and had to snatch some up immediately.  The colors in this line are just so bright and fun, and I absolutely loved all of the diecut icons that went along with it.  Admittedly, despite my hesitation to scrapbook 'in order', I am fairly caught up on Christmas pictures, but I knew this line would be a perfect compliment to a darling picture of Justin from last December.  Here are a couple of detail shots; a closer look at the journaling:


And a peek at the top left of the page.  I LOVED those little peppermints and couldn't resists embellishing the centers of them, in this case with a button and some of the yummy coordinating bakers twine:


This line was just so fun, I couldn't stop at one page, and used all my extras, plus some added supplies, to create the next page:


This one features a picture of Justin on his very first Christmas, back in 2009.  I wanted the title to have the same fun look and color scheme as the patterned papers, so I simply typed it into my word processing program, selected a coordinating font, and changed the colors of the letters to mimic those seen throughout the patterned paper.  Here's a closer look:


I loved and wanted to use so many of the patterned papers, but at the same time I didn't want the page to take away from that sweet photo.  So, I used the circles, to highlight a variety of the papers, while still keep the focus on the picture and the memory. 

I will be back soon, to share some school pages I've been working on.  Thanks for stopping by!

Thursday, August 4, 2011

In birthday mode

The end of this month will bring about some significant changes for our little family -- most of which involve this guy:


Our sweet, talkative, inquisitive first born will not only be starting Kindergarten in a few short weeks, but will also be celebrating his sixth birthday!  Honestly, I don't know which of these scenarios is more shocking, or more likely to evoke buckets of tears, for me!  Needless to say, if I hold it together for the month of August, that will be a huge accomplishment!  The long list of tasks that I have to complete, before the end of the month, should be a good distracter from the tears and inevitable breakdown, however. 

With said birthday on the horizon, we've been planning, dreaming and brainstorming birthday ideas around here.  Surprisingly, I've decided to keep things a bit simple this year and have 'hired out' his party to the local YMCA swimming pool.  That hasn't stopped us, of course, from still coming up with a party theme (batman), handmade invitations, and scouring the internet for favors, decoration and cake ideas.  I'm sure I'll be sharing more, post bday, of all the fun and celebrating that we did that day.

So, with all this talk of birthday prep, I thought it would be fun to share a recent page I completed celebrating our other favorite guy's most recent birthday.


Well, so he turned two in December and is now actually well on his way to three...!  I will still consider it an accomplishment that this page was completed before he was officially another year older!  Besides, had I scrapbooked it sooner, these darling paper and embellishments from My Mind's Eye, definitely wouldn't have been available.  I think the colors of this line work just perfect from our resulting pictures from the day.  Here's a closer look at page one (click on any of the pictures to view them larger):


and page two:


Better get back to the to-do list.  Thanks for stopping by today!