Gams

Showing posts with label Gifts. Show all posts

Friday, February 12, 2016

DCWV: Valentine's Envelope Treat Sleeves

Happy Friday blog friends!  If you're making any Valentine's gifts for your sweeties this year - it's crunch time!  Lucky for you I'm sharing a sweet and easy to assemble treat idea.  The supplies are simple and the result is not only yummy but adorable.

 
The cuter the packaging, the sweeter the treat, right?!  I used DCWV's Envelope's DIY Project Stack to jump start my project.  I was thrilled to find a pattern for the treat sleeve in this stack.  I chose a pretty pink ombre, text, and black and white arrow pattern papers, to compliment the Valentine theme.


It's no secret that I love to bake, so I've filled my treat sleeves with a half dozen mini cookies.  If you're not a baker, or don't have time you could easily substitute conversation hearts, packaged chocolates or even store bought cookies.


I wanted to give my recipient a peek at what was inside the sleeve, so I cut a small circle-shaped window out of the front portion.  My cookies are enclosed in a clear bag, so while the window reveals a peek, the treats remain secure inside.


A simple bit of ribbon, stamped sentiment, punched heart and DCWV gem sticker finish off the design and presentation of my baked goodies.


I hope this post inspires you to whip up a little something for those you love and appreciate.  We gifted several of these to my kid's teachers and I'm saving a few more for my favorite GAL-entines!  Happy heart day!

Tuesday, October 27, 2015

Spooky Treat Bags: A Just Nick DT project

Good morning, friends!  The countdown to the holiday of treats and sweets is upon us!  It's not too late to craft up a few goodies to pass on to some of the special people in your lives, though.

I quickly crafted up a couple of festive treat bags using Just Nick's Spooky Stuff cut file, plain white bags and some basic embellishments from my stash.

Supplies used: American Crafts - white treat bags, diecut number, sequins, buttons; DCWV - patterned paper; Studio Calico - glitter banner; Pebbles - large gld paperclip; Stampin Up - stamped sentiment; Hero Arts - ink; Bazzill - cardstock; Other: vellum, crepe paper, crochet thread, seam binding ribbon, tags.
Here's a closer look at each of the bags and the details that make them come to life...


Pop over to the Just Nick blog to see my post featuring these projects.  Happy Halloween!
 

Friday, October 23, 2015

DCWV: Happy Day Memo Board

Good morning, blog friends!  Have you been spotting these cute memo boards all over the place lately?  They are intended to provide you with a central place for hanging onto all of those lists, coupons, notes and bits of paper that come into and out of our lives.  As a papercrafter though, I myself can't look at them without dreaming up possibilities to embellish and transform them into a pretty home décor piece.  So, that's just what I did!

I grabbed DCWV's Happy Day stack for this project because I love the neutral color palette that is carried throughout and the pretty pops of gold.  I had fun making all sorts of tags, banners and accents to decorate my memo board.

Supplies used: Target - memo board & large clothespin; DCWV - Happy Day Stack (all patterned papers); Stampin Up - feather stamps & coordinating dies, butterfly punch, flower punch; Crate Paper - chipboard heart, vintage button, and mini clothespins; Basic Grey - mini letter stickers; American Crafts - twine; Other - ribbon.
Let's take a closer look at all of the elements that I've included within my framed piece.

One of my favorite patterns from the stack is the woodgrain covered in intricate shaped frames.  I cut out one of the small frames from the pattern and used it to highlight a punched and embellished butterfly.  It's backed with a doily for a simple yet elegant look. 
 

This sweet little label that adorns the bottom portion of my photo was again, simply cut from one of the included patterns.  I customized it a bit further by adding our last name in coordinating letter stickers from my stash.


There are several pages of cut apart elements included in the stack.  These cute banners are part of one of those patterns.  I accented them with some stamped and embossed feathers for added dimension and interest.


The final element on my décor piece, again features one of the pre-designed sentiment cards that are included in the patterns of the Happy Day stack.  I loved the sentiment and wanted to draw more attention to it by adorning it with a dimensional floral. 

To create my flower, I punched several layers from the pink and gold dotted patterned paper.  I layered the punches together and adhered them with a button center.  The leaves that accent this floral piece were fussy cut from another of the patterns included in the stack.


With just a little bit of creativity and a beautiful stack of DCWV patterned papers it was easy to transform this bland memo board into something special that I will be proud to display in my home!

Monday, October 19, 2015

Fall Cards & Neighbor Treat: NEW DCWV fall Stacks

Good Monday morning, friends!  I've been busy crafting up some seasonal projects that I'm excited to share with you.  DCWV has released some brand new fall themed stacks that are available at Joann's stores and online now, both in 12x12" and 6x6" sizes. 

The Harvest House stack is rich and autumnal and the scaled down patterns in the 6X6" stack were ideal for a card. 

Supplies used: DCWV The Harvest House 6X6 Stack and glitter cardstock; Just Nick Studio stems cut file; Maya Road decorative chipboard frame; Teresa Collins gold adhesive dots; American Crafts twine; Echo Park 'thanks' metal die; Silhouette
I fussy cut a couple of the leaf designs directly from the patterned papers and used my electronic diecutting machine and several of the more solid pattern designs to cut out some additional leaves.  Throw in some vellum, glitter and specialty papers and you've got a beautiful layered design. 

Stacking the leaves amongst each other creates lots of texture as well as a home for my diecut sentiment.


The Spooky Delights stack has loads of fun Halloween elements and icons that work for both cute and scary projects.  I couldn't resist fussy cutting this trio of festive creatures to adorn my Halloween greeting.
 

Supplies used: DCWV Spooky Delight 6x6 Stack and cardstock; Maya Road ribbon; American Crafts twine; Jillibean Soup enamel stars; foam adhesive.
To ground my scene, I cut out the "Happy Halloween" label, popped it up on foam adhesive and embellished it with some coordinating May Arts ribbon. The combination of elements makes for a fun and festive seasonal card.


I used the 6X6" stack on my card, so I wanted to try out the 12X12" stack of the same design, for another fun project.  This one is perfect to fill with treats and hang on an unsuspecting neighbor's door.

Supplies: DCWV Spooky Delight Stack; May Arts ribbon; October Afternoon buttons; Tombow Extreme adhesive; Other: black crepe paper and crochet thread.
To construct the cone, I used a  favorite 12x12 sheet from the stack.  I simply rolled the sturdy paper into a cone shape, trimmed along the top edge for a clean finish, and secured the paper onto itself with Tombow Extreme adhesive for a nice secure hold.
 
Now comes the really fun part - the embellishing!  I whipped up a simple crepe paper fringe to decorate the top of my cone and used some coordinating ribbon to make my 'hanger'.
 

I didn't have to look far for the remainder of my embellishing, either. The Spooky Delights stack includes lots of fun tags and elements that are perfect for fussy cutting.  A few of those fun and festive images strung onto my ribbon hanger and my project is nearly complete.  Last but certainly not least, it's ready to be stuffed full of candy and goodies!
 

I hope these projects inspire you to create something fun for the season!


Monday, December 15, 2014

Quick and pretty holiday gift bags

Hello!  Good Monday morning! I'm popping in real quick to share some quick and pretty holiday gift packaging that I whipped up for the LMT blog.  With only ten days remaining until Christmas, I'm sure we're all in need of some simple gift wrap ideas, am I right?! 


Supplies used: Die Cuts with a View Candy Cane Lane Stack; Love My Tapes black glitter paper and red & white striped washi tape; American Crafts red twine; Jenni Bowlin red adhesive pearls; Michaels glittery red ribbon.
A kraft colored bag or container is always a good starting point, for a project like this.  Using a neutral base, allows you to work in just about any color palette you might have on hand.  I purchased my kraft gift bags at my local dollar store - 4 for $1.00! 
 
For the two bags I'm showcasing today, I used the Candy Cane lane stack from Die Cuts with a View.  It features a bold combination of red, black and white alongside some graphic yet elegant images.
 
 
Both bags have a wide glitter banner, cut from the Love My Tapes adhesive glitter sheets, as a backdrop.  The banner is not only pretty, but creates a nice focal point for the greeting tag.


The tags were cut from the Candy Cane Lane papers and simply embellished with a strip or two of washi tape and some pretty adhesive pearls.  The back of the tags are blank to write my 'to and from' message, and  are finished off with a tie of sparkly ribbon and some matching twine.


The best part about this project is that, once my supplies were gathered, I put together these two bags (present inside and tags addressed) in under ten minutes!
 
I hope this gives you some hints for completing your holiday wrapping!  Thanks for stopping by!
 

Monday, December 17, 2012

Pebbles: Holiday Hostess Gift Set

This time of year bring about so many opportunities for giving and gifting.  With that in mind, I always attempt to have a few hostess gifts on hand, for last minute parties or gatherings.  I thought a set of handmade tags, garland and bows would make a nice little gift set, since gift wrapping is something most everyone does this time of year! 
 
For a festive approach to this project, I dug into my Pebbles stash and pulled out several of the red and green patterned papers I had, alongside some neutrals and a splash of light pink. I put my holiday punches and diecut machines to work to add 'a little Christmas' to this project, that otherwise uses not a stitch of holiday themed product. I love how all of these simple gift accessories look all packaged up in a cute reused embellishment box.  And of course, I HAD to decorate the cover too!  Gotta make it pretty!
 
Pebbles Supplies used: Walnut Grove 6x6 Paper Pad (751307) Walnut Grove Clothes Pins (747190) Walnut Grove Accent & Phrase Stickers (732119) Walnut Grove Carrie (751302) Walnut Grove Grace (751303) Walnut Grove Harriet (751294) Walnut Grove Corrugated Kraft Thickers (732122) Walnut Grove Corrugated Crimson Thickers (732123) Walnut Grove Corrugated Black Thickers (732134) Seen & Noted Checklist (751320) Seen & Noted 6x6 Paper Pad (751323) Sunnyside Sprout (751281) Sunnyside Clear Stamps (747183) Let Freedom Ring Samuel Adams (751259) Coordinating Cardstock Dark Kraft (71563) Coordinating Cardstock Leaf (71052) Coordinating Cardstock Crimson (71029), Other: Hero Arts dots, Doodlebug pink doodletwine, American Crafts buttons, Martha Stewart snowflake punch, Cricut, crochet thread, Stampin Up ink, foam adhesive, machine stitching, glitter

Here's a look at the contents of the package with the lid removed...


Paper bows seem to be showing up often in the paper crafting world.  There are several tutorials for creating your own.  I just drew up a simple pattern myself, in order to customize the size of the finished bows to fit within my box.  I added a couple simple embellishments to each one to finish them off.

 
What is a package without a tag?  There must be a place to write the 'to' and 'from'.  Again, I used some simple drawn patterns (the holly leaves), punches (snowflake) and cricut cuts (poinsettia) with pretty Pebbles paper to craft these beauties.  Add a little bit of baker's twine to the top and they are ready to add your sentiment and attach to a package or gift bag.


To make this simple but pretty paper garland, I got out my circle punch and went to town punching scraps of the different papers I had already used.  To attach them simply feed them through your sewing maching one by one.  I wrapped the whole string of them around a coordinating piece of cardstock and held it all together with one of the Walnut Grove wooden clothespins.  It makes a simple but sweet presentation, don't you think?

 
And lastly, a couple of 'for you' tags which tie all of the elements together.

 
I plan to pair this sweet little gift set with a roll of kraft wrapping paper to make the gift complete.
 
Thanks for stopping by today!  Hope your holiday season is and continues to be very merry!
 

Wednesday, October 3, 2012

Tricks and Treats

Can you believe that we are already a few days into the month of October?  I'm still trying to wrap my brain around that fact!  It goes without saying though, that this month brings about lots of Halloween hoopla at our house.  As with many of the major holidays, we like to use this time of year as an excuse to whip up some yummy treats and gift them to friends, neighbors, teachers, classmates, etc.  It's a great opportunity to bake up some of our favorite holiday goodies and let those around us feel special with a simple little gift.  (Not too mention the fact that my jeans and scale are thankful that these treats do not sit long at our house!!!).

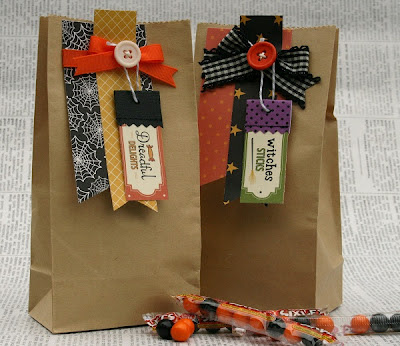
You can't give away a yummy treat without some cute packaging though, now can you?  I don't think so!  Which is why I broke into some of Pebbles new, adorable Tricks and Treats collection to put together these ghoulishly cute tags!


Supplies used: Tricks and Treats (751337) Tricks and Treats (751329)  Tricks and Treats (751334) Tricks and Treats (751338) American Crafts Coordinating Cardstock - black (71082) Other: Doodlebug Doodletwine (gray),  American Crafts buttons, machine stitching, buttons, tiny attacher.
I dug into the 6x6 paper pad first, as the small scale design of these papers was just perfect for the size of my banner style tags.  I love all of the sentiments on the label-type paper ('gooey globs', 'spookey treats', 'toe of frog') and thought they would be a festive little addition.  I cut them out, stitched up a little topper to adorn them and threaded them on some baker's twine to dangle from each button.  I love the whimsy that they add!

Here's a look at the tags 'in action'.  I've simple stapled them onto small craft bags that I found at my local craft store, and they are ready to give.


Head on over to the Pebbles blog to the 'Whip It Up Wednesday' post featuring my tags and another fun project!

Thanks for stopping by!  I have lots to share in the coming days, so I hope you'll be back to visit soon!