Gams

Friday, November 30, 2012

On a card kick...


Are you the type of crafter that has to completely clean up your workspace in between projects?  I must say, I resemble that description!  I love to have a fresh start with each new card/page I begin on.  Oftentimes when cleaning up my creative mess, I'm left with bits and pieces that I'm not sure how to store.  And even better, those bits and pieces are often already coordinated, as I had or was planning to use them all on the prior project.  So, what is a girl to do?  Craft up some quick and easy cards, of course! Here's a few recent cards I whipped up while in the process of cleaning up my workspace.

This first card was made with Doodlebug's baby boy line.  I can't get enough of the sweet little elephant sticker - I'm sad there was only ONE of him on the whole entire sticker sheet. :( Boo!  Good thing I have the girl version too! 

Since I know a sweet little guy who is about to turn one and also happens to have a nursery decorated in elephants, I knew I had to make him a birthday card with my beloved little sticker.  Don't you love the multicolored scallop?  That is actually a dot paper from the collection that I fussy cut to achieve a scallop border.

Supplies used: Doodlebug patterned paper, stickers (stars and elephant); Paper Studio embossing folder, Tim Holtz mini attacher;  Jillibean stamp, Colorbox ink, Other: crochet thread and toothpick
This next card is all Doodlebug again.  This time mostly from their Christmas collection from 2011.  Yep, more scallops going on here as well.  I can't help my self!  Seriously, someone needs to hide the scallop punch from me - I have a problem!  LOL!  This scallop border is actually a diecut from one of the Doodlebug cute cut sheets.  The colors didn't work for this card, so I just flipped it to the back side to use the white.  You'd never know otherwise, would you?


Supplies used: Doodlebug patterned paper, gems, Boutique button, and scalloped edge diecut Pebbles ribbon; Other: crochet thread and foam adhesive.
You can never have enough birthday cards on hand, can you?  To keep myself from having to put together a crafted greeting (because that's what everyone expects from me now!) five minutes before we walk out the door to the party, I've tried to stock up on crafting bday cards when I can.  I like to think that this one can work for either a male or female.

Supplies used: Bella Blvd patterned paper and stick pin flag; Bazzill cardstock; Doodlebug Boutique button; Other: crochet thread.
And finally, because I'm loving playing with Bella's latest Kiss Me collection, here's a lovey-dovey card.  Oh yes, and more scallop borders...  See, I told you, it's a problem!

Supplies used: Bella Blvd patterned paper, 'I love you' chipboard phrase, and flower button, Martha Steward ribbon, Stampin' Up scallop border punch, Other: crochet thread.


Well, I better sign off while my baby girl is still napping and go snap some pics of my December Daily, as promised.  Be back soon to share!
 

Thursday, November 29, 2012

Togetherness, Pebbles: A Layout Share

The next big wave of new scrapbooking products won't be introduced to the craft world until after the holidays, during the winter trade show.  Fortunately, however, many companies are coming out with a mid-release collection that debuts during the time in between the summer and winter shows.  Have you seen Pebbles mid-release titled Family Ties? It is full of bright blues, yellows and greens with a multitude of stripes, dots and floral patterns.  Pretty perfect for just about any theme or subject you may want to document centered around family. 

All this week on the Pebbles blog, they are featuring projects with this new collection.  I hope you'll stop by and see all of the pretty things the team has been making. I had a page up on the blog on Monday.

Supplies used: Pebbles - Family Ties 6x6 Paper Pad (751360) Family Ties Accent & Phrase Stickers (732149) Family Ties Accent & Phrase Stickers (732148) Family Ties Phrase Cards (751358) Family Ties Journaling Cards (751357) Family Ties Stamps (747201) Coordinating  American Crafts Cardstock - Mustard; Other supplies used: Making Memories buttons, October Afternoon flag 'sticks', computer font, crochet twine, machine stitching, foam adhesive 

Isn't it funny how one tiny little stamp can inspire an idea for a whole 12x12 page? That's just what happened to me when I first saw the banner style stamps from the new Family Ties collection. The 'family' and 'cousins' word stamps were the first to catch my eye and remind me of some sweet photos I had not yet scrapped, of my son and his cousin a few years back. I just love how these stamps look stamped on white paper, cut out and attached to a little wooden stick. They make for a fun and dimensional accessory to the page.


The phrase and journaling cards that come with this line are full of fun text and clever captions.  I couldn't resist the urge to squeeze several of them onto this page!

 
Thanks for stopping by, friends!  I know I mentioned last week that I was hoping to share my December Daily cover and foundation pages with you very soon.  Hoping I get a chance to photograph them tomorrow and share them before the official start of December. In the meantime, have a great day!
 

Wednesday, November 21, 2012

Fall Fun, Bella Blvd: A Layout Share

When it comes to trends in the scrapbooking world (or otherwise!), it seems I'm often a little late to show up to the party!  That doesn't mean I shy away from them or won't eventually try them out, but usually I have to ponder them a bit and figure out how they work into my own personal style. 

As I'm sure you've noticed, polaroids have been popping up everywhere in the scrapbooking world - on patterned papers, journal cards and even little mini replicas that allow you to slide in and customize your already printed photos. 

I decided to give this trend a try on a fall themed page I made for Bella Blvd.  I simply cut my 'polaroid' frames out of white cardstock and mounted my photos on the underside of the frame, to make them look even more realistic. 


Bella Blvd supplies used: Thankful: Burlap, Turkey Tracks, Homey, Cute Cuts, Alpha+Bits Stickers; Blue High Five Alphabets, Gulf High Five Alphabets; Ciao Chip: Thankful, Birthday Boy, Finally Fall, Baby Boy; Designer Tapes: Yellow Chevron; Button Market: Merlot Flowers, Gulf Squares, Fruit Punch; Other: American Crafts Cardstock and twine, computer font, machine stitching

As you can see, I set aside a couple of the frames for my title/journaling and embellishment.

 
I love all of the colorful leaf images from the Thankful collection!  I fussy cut some from the Cute Cuts sheet and stitched them down the center for added depth and dimension.

 
Snuck in some more machine stitching detail, sewn on buttons, and a few strips of Designer tape to make the polaroids look as if they are randomly taped to the background.

 
Thanks for stopping by today!  I'm heading out tomorrow to enjoy a few days of the holiday with my family.  Be back with more crafty shares very soon!
 

Tuesday, November 20, 2012

Pebbles, "Be Grateful": A Layout Share

Happy Thanksgiving week to all my US readers!  I simply can't believe this holiday is already upon us, though I do think it came a bit early this year!  I just dropped my little guy off at preschool for his Thanksgiving feast.  A feast of cheese, crackers, muffins, grapes and milk -- not sure that's exactly what the pilgrims were serving up on this occasion! LOL! ;)  The kids are sure to be happy with that menu, though!

I'm up over on the Pebbles blog today.  All week long in honor of Thanksgiving, they are featuring layouts, cards and projects that have an "I'm Grateful for..." theme.  When I count upon my gratitudes, my children are, of course, at the top of my list.  So, this assignment gave me a great 'excuse' to document those things that I'm thankful for about each individual child. 

I went through my recent photos and selected a favorite of each of my three kiddos and converted them to black and white.  Then I pulled out my beautiful stash of Pebbles Walnut Grove, typed up a little list of gratitudes specifically pertaining to each child and got my craft on!  Here is the end result:


Pebbles supplies used: Walnut Grove Harriet (751294), Walnut Grove Caroline (751295), Walnut Grove Charles (751296), Walnut Grove Nellie (751297), Walnut Grove Nancy (751298), Walnut Grove James (751301), Walnut Grove Eliza Jane (751304), Walnut Grove Carrie (751302), Walnut Grove Corrugated Black Thickers (732134), Walnut Grove Accent and Phrase Stickers (732119), Walnut Grove Dimensional Stickers (732118), Walnut Grove Mini ABC Stickers (732121), Seen & Noted Journaling Cards (747194), Seen & Noted Library Cards and Pockets (747192), Coordinating Cardstock Surf (71508); Other: American Crafts twine, My Mind's Eye buttons, Making Memories button.
I love, love, love the mixture of florals, colors and patterns in this collection.  While it contains many feminine details, there are just enough masculine patterns and colors that it works just great for boy pages, as well.  Look at all of this yummy color in one little detail shot!  I snuck in a few Seen & Noted Journaling cards onto the page to add some additional text detail, and in this case, an extension of the title.


Aren't these dimensional flowers sweet?  I love how they look topped with a button!


More flowers and a pretty little butterfly that I topped with a stick pin and some twine.


A closer look at the journaling - love notes to my babies!

 
Thanks for stopping by, friends!  I'll be back tomorrow with another fun fall page, this time using Bella Blvd!
 

Friday, November 16, 2012

Thankful: A Layout Share

If you are anxious to get the weekend started (who isn't?!?) then I hope you'll head on over to the Bella Blvd blog and check out Friday's edition of Saturday Sketches.  I have a page up over there today using a sketch by Becky Fleck.  I LOVED this sketch!  The multitude of 2x2" squares allowed for lots of room for many photos, patterned paper squares and embellishment!

This sketch proved to be just perfect for this series of sweet photos I took of baby girl and her Daddy.  The were having a snugly little moment and I couldn't resist just snapping away.  I love how these snapshots looks all lined up -- and I think presenting them this way, tells a story all on it's own.  But, since I like to record some journaling on nearly every page I do, I chose to document a bit more about their relationship through my text.  Bella's Thankful line was just perfect to help me capture these memories, in both colors and theme.

Supplies used:  Bella Blvd Thankful: Burlap, Our Spot, Homey, Cute Cuts, Alpha+Bits Stickers, Just Write Journaling Stickers; Birthday Girl: Miles of Smiles; Brown-Cream High Five Alphabets; Ciao Chip: Thankful Icons, Stars & Hearts; Designer Tapes: Pony Dot; Button Market: Merlot Flowers, Checkers; Flags: Thankful 1; Other: computer font (veteran typewriter), American Crafts jute, machine stitching, Versamark ink, Distress Ink, Stampin Up Medallion stamp, Jillibean Soup kraft envelope, October Afternoon Sprinklers.
The wooden Market Button is a fun and unexpected touch in the lower left corner of the page.  This detail shot also shows a look at some subtle misting I did on the page background.


My initial thought was to include a little written note from my husband to my daughter.  This cute little kraft envelope is the perfect spot to hold it.  I dressed up the flap with some of Bella's Designer Tape and further accented it with a Bella flag.  It creates a fun little embellishment cluster.


I have been working on putting together a little December Daily album.  So, I hope to get some pictures snapped shortly to share.  Thanks for stopping by today!  Hope you have a great weekend!
 

Friday, November 9, 2012

LCTS sketch #157 :Halloween Haunt

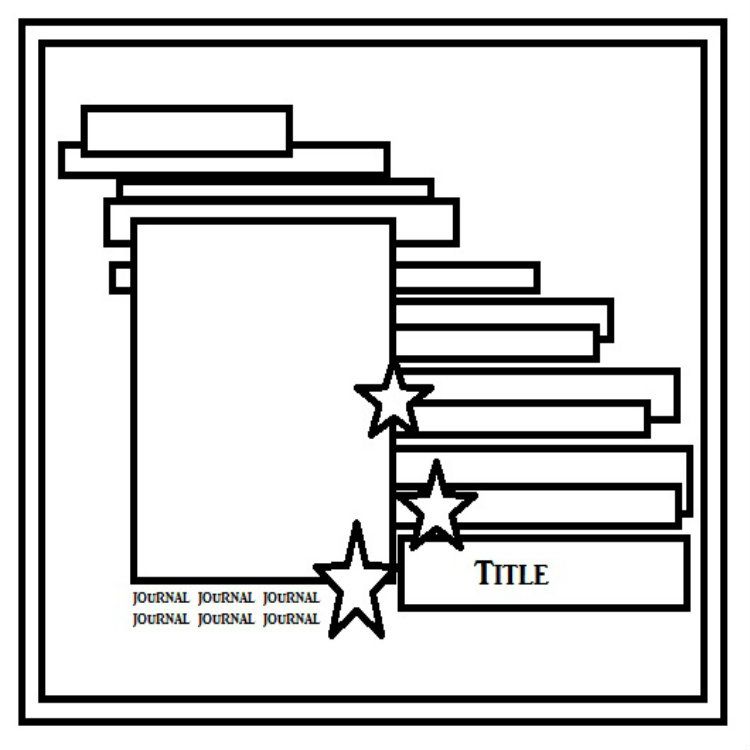
It's time for a another sketch reveal over at Let's Capture These Sketches.  Here's the sketch by Jocelynn Roy:


And a look at my interpretation:

Supplies used: Pebbles Trick and Treats collection: American Crafts chipboard Thickers, Doodlebug Boutique button, Martha Stewart glitter; Stampin' Up scallop border punch, Versamark Ink, EK Success black embossing powder; Other: foam adhesive, computer font, machine stitching

I dug into my Halloween photos from last year, grabbed Pebbles Trick and Treats collection, and went to town cutting loads of banners and strips to fill up the right side of the page!  I love that this page gave me the opportunity to use so many cute patterns from this collection - both the full 12x12 sheets mixed with patterns from the 6x6 paper pad.  There were lots of opportunities to layer and embellish with the coordinating sticker sheets, as well.

But that's not all, there is a little hidden surprise to the page.  Since the sketch only allowed for one photo, but the event I wanted to document had many more, I had to find an alternative.  Four more full size 4x6 photos and journaling are hidden under the main picture, in a little bitty booklet of sorts.  Take a look...


I'm having a little bit of a love affair with the button topped paper bows lately.  If you haven't noticed, I snuck a few on a project here or there and I'm sure there will be more to come.  I just couldn't resist making one out of this spider web paper and topping it with a button and that mini pumpkin sticker.  Cute, huh?


The title was done with one of my very favorite sets of American Crafts Thickers.  They come in raw chipboard making them ultra easy to modify and customize to fit the look and colors of your page.  I chose to emboss them with a shiny black powder, which makes quite a statement on the page.  A little bit of glitter on the jack-o-lantern sticker can't hurt either, can it?


That's it for today!  I've been busy crafting up a couple simple things for a very special party this weekend.  Shhh, my baby girl is turning one!  I'm hoping if I don't say it loud enough it won't really happen (*wink!).  Where did that year go? 

Have a great weekend!  I'll be back with more crafty shares soon!

Tuesday, November 6, 2012

The Model of Sweetness: A Layout Share

Have you ever had one of those photos that you love so very much, you are actually afraid to scrapbook it???  You're fearful that you might 'mess it up' or not do it justice on a page, or even better yet - you might come up with the perfect idea for it later on?  The picture on this page was certainly one of those for me! It is a favorite picture of my sweet baby girl, modeling some of my good friend's darling headbands.  (BTW, if you like this sweet headband, head on over to Jenniferkatedesigns on etsy to check out her selection.  They are adorable and sooooo reasonably priced.  She has some really cute ones for the holidays, too!). 

I just love Emerson's sweet little expression, the sparkle in her eyes and even the string of drool hanging from her chin!  Wouldn't you know that Bella's new Kiss Me collection featured the perfect color palette for this treasured photo!  That was just the push I needed to finally put this picture on a page.


Supplies used:  Bella Blvd - Kiss Me: Bouquet Kiss, Flutter, True Love, Alpha+Bits; Baby Boy: Baby Blue, Borders; Baby Girl: Snuggly Safari; All Inclusive: Ocean View; Piggy-Punch High Five Alphabets; Ciao Chip: Border; Designer Tapes: Piggy Pink Stripe; Button Market: Tie Dye, Wood Mix; Flags: Just Married, Home Sweet Home, Birthday Girl 1; Other: machine stitching, crochet thread, toothpick, computer font - Veteran Typewriter, foam adhesive.

When it came time to embellish this page, I turned to my stash of Bella flags and wooden buttons. While none of those products were specifically made to coordinate with this collection, as you can see, they still work together seamlessly.  I love the bit of neutral that the wood buttons provide for this, as well. They allow for a resting place for the eye, among all of the patterns and colors throughout the page.


I included flags with a wedding, home and birthday theme, but altered them a bit by adding stickers or strategically cutting them to fit with my page and picture.

 
Aren't the flags and wooden buttons fun?  Stop by the Bella blog, to see lots more cute projects with these embellishments.  Thanks for stopping by, today!  See you soon!
 

Saturday, November 3, 2012

Saturday Sketches with Bella: PLAY

If you have the chance to sneak in some creative time this weekend, but need just a little bit of motivation - you might consider a stop over at the Bella blog for the latest edition of Saturday Sketches.  There is a great sketch by Becky Fleck of Pagemaps fame, that includes the option of four photos including one focal point, and a unique title placement.  Here is my take on the sketch:
 
Supplies used:  Bella Blvd's Making the Team: Soccer, Cute Cuts, Borders, Miniatures Stickers; Green High Five Alphabets; Designer Tapes: Jail Bird; Button Market: Orange Stars; Other: Cuttlebug dot embossing folder, crochet thread, machine stitching, foam adhesive, American Crafts cardstock, computer font - Century Gothic, Dienamics 'label' shaped die.

The sketch provides the opportunity for a large focal point photo to be placed on the right side of the page.  I didn't have a photo in mind, that I wanted to take center stage, so I adjusted my design and placed my journaling there instead.  I printed the journaling out on three label shaped diecuts and stacked and staggered them, to fill in the space that would otherwise house a photo. 


Bella's Making the Team collection is one of my favorites to date.  I love that the color scheme will work for nearly any sport or team, and of course, the inclusion of all of the cute little images and icons.  The baseball and bat were cut from the 'Cute Cuts' patterned paper sheet and are nestled alongside a fun little accent that I made from layers of cardstock, designer tape and a button.

 
Thanks for stopping by!  I'll be back soon with more Bella goodies to share!
 

Friday, November 2, 2012

Birthday Boy - A Layout Share

Happy Friday, everyone!  Hope you're enjoying a fun start to the weekend.  I just got the kiddos tucked into bed myself.  Now the decision is whether or not to retire to the couch and space out in front of the TV or do a little scrapping.  Problem is, my craft desk is a disaster and would likely require a cleaning prior to any actual scrapping.  You see where this is going, don't you?! ;)
 
Before I turn into a complete waste for the night, I thought I'd hop on here and share a page that was featured over on the Bella blog this week.  You can see the post here and all of the other pretty pages that were featured, as well.  I dug into my stash of Bella Birthday Boy goodies to complete this celebratory page:
 
Supplies used: Birthday Boy: About a Boy, Eat Cake, Borders, Alpha+Bits Stickers, Chipboard Icons; All Inclusive: Bookin' on the Beach; Designer Tapes: Gulf Dot; Button Market: Stars, Orange Stars, Outdoors; Flags: Birthday Boy 1
 
 
I love finding new ways to include and use the Designer Tapes.  On this page, I decide to create a pleated ruffle alongside some other border pieces.  I think the torn edge at the end lends well to the masculine feel of the page.


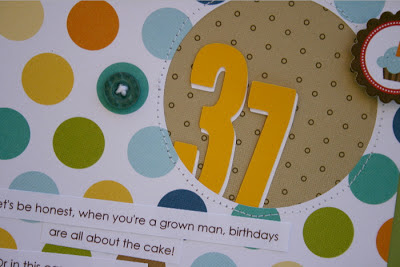
Whether my hubby likes it or not, I had to include his age and did so by tucking under the edge of the large focal circle.  Couldn't resist adding a wee bit of stitching, as well.


By the way, if you are anxious to get your hands on Bella's new Kiss Me collection, you'll be happy to know that it's now on it's way to scrapbook retailers.  Check with your local store to see if they are carrying it.  I have been having SO.MUCH.FUN with this darling collection.  In fact, I'll have a new page to share next week with it. Stay tuned!


Help spread the word!
 
Thanks, as always, for stopping by!