Beyond the Internet, however, I needed a way to store and organize additional ideas on paper. A notebook, of sorts, that I could sketch in, make lists, add pictures, carry coupons -- and one that I could easily store and take with me in my purse (or gigantic diaper bag, as it currently stands!). So, along came the idea for this sweet little thing:
 |
| Supplies used: Paper - My Little Shoebox Sew Cute collection: Sew Crafty, Nothing But Buttons, My Little Shoebox Farmer's Market collection: Cherries Jubilee, Lettering: Doodlebug glitter letter stickers and Simply Sweet rubon alpha, Diecut: My Favorite Things label die, Embellishments: Making Memories mini safety pin, My Mind's eye stick pin, Doodlebug Design baker's twine, Other: eyelet, ribbon, embroidery floss, machine stitching, computer font, buttons, 8x8 page protector, glossy accents, Stampin' Up scallop border punch. |
I created the whole thing from scratch, using a piece of chipboard for the base. Pretty cute, isn't it? I think it may have something to do with that darling paper line from My Little Shoebox. I've been hoarding a few pieces of it for quite some time and finally found just the right project to use it on. Here's a close up of the title label. As you can see, I put my sewing machine to good use on this little project -- it went perfect with the theme of the book, after all!

I had so much fun decorating and adding dimension to all of the little diecut pieces that I cut from the 'Sew Crafty' patterned paper. To make the bobbins more dimensional and realistic, I added embroidery floss, ribbon, buttons and paperclips in coordinating colors. I even pulled out an eyelet to add a realistic looking hinge to the scissors, and covered the heart shaped button piece with glossy accents to mimic a real button. I adhered all of these elements with a strong adhesive, to ensure that they stay put as this little book get pulled in and out of my bag, a countless number of times.


A little pocket at the start of the book, provides a nice spot for storing coupons, pages torn from a magazine or any other extras I want to hang on to. I used the cute pink ruler that I cut from the 'Sew Crafty' paper to distinguish the pocket's opening and couldn't resist adding a little stick pin for decoration, as it again, coordinated so nicely with the sewing theme!


Here is the backside of that dividing page:

At the back of the book, I added a spot to house a pad of paper for additional note taking, sketching, list making, etc. Rather than adhering the backside of the notepad directly to the book, I cut a slit in the patterned paper, so that I could remove the notepad once full, and replace it as needed, in the future.


I had so much fun decorating and adding dimension to all of the little diecut pieces that I cut from the 'Sew Crafty' patterned paper. To make the bobbins more dimensional and realistic, I added embroidery floss, ribbon, buttons and paperclips in coordinating colors. I even pulled out an eyelet to add a realistic looking hinge to the scissors, and covered the heart shaped button piece with glossy accents to mimic a real button. I adhered all of these elements with a strong adhesive, to ensure that they stay put as this little book get pulled in and out of my bag, a countless number of times.

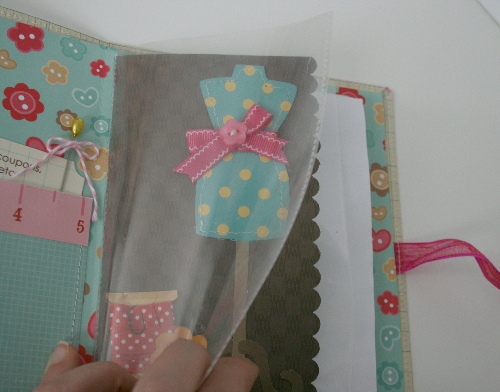
Here's a look at the inside.

A little pocket at the start of the book, provides a nice spot for storing coupons, pages torn from a magazine or any other extras I want to hang on to. I used the cute pink ruler that I cut from the 'Sew Crafty' paper to distinguish the pocket's opening and couldn't resist adding a little stick pin for decoration, as it again, coordinated so nicely with the sewing theme!

For even more storage space, and a little extra fun, I folded a 8x8 page protector in half and sewed it into the binding. This creates two extra 'see through' pockets at the front and back of the book. I like that it, once filled with items, will provide a bit of a 'peek-a-boo' element to the decorative divider that sits behind it. I again, gussied up the dress form on the following page, that I cut from the 'Sew Crafty' patterned paper, with ribbon, a button and machine stitching.
Here is the backside of that dividing page:

At the back of the book, I added a spot to house a pad of paper for additional note taking, sketching, list making, etc. Rather than adhering the backside of the notepad directly to the book, I cut a slit in the patterned paper, so that I could remove the notepad once full, and replace it as needed, in the future.

Seeeeewwww, that's my fun project share for today! I've already quickly begun to fill this little book up with loads of ideas and inspiration for my next scrapping session. Thanks for stopping by! I'll be back soon with some more layout shares. :)
what a cute notebook!!
ReplyDelete